Soft Gingerbread Cookie Recipe: A Delightful Treat for the Holiday Season
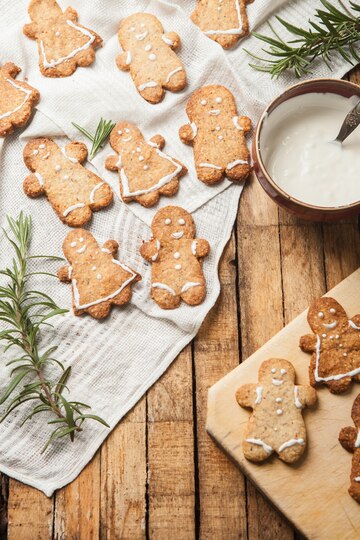
Classic treats like gingerbread cookies are ideal for the holidays. I simply adore the soft gingerbread cookies because they add to the home’s cozy atmosphere with their inviting and warm scent.
These Soft Gingerbread Cookie Recipe can be enjoyed all year round, even though they’re usually associated with Christmas. I’ll be sharing the simplest soft gingerbread cookie recipe that will make a lasting impression on anyone who tries it.
The History of Gingerbread Cookies
The history of gingerbread cookies is extensive and goes all the way back to the Middle Ages. Originally made with flour, honey and ginger. They were frequently used as a medium of exchange. Gingerbread cookies gained popularity in Europe during the 16th century and elaborate decorations were frequently used to decorate them.
Why Are These Gingerbread Cookies Soft?
As there is a lot of molasses in them, gingerbread cookies are soft. Sugar cane is used to make molasses which is a thick and sweet syrup. It also draws and retains moisture because it is a humectant. This is the reason for the chewy, soft texture of gingerbread cookies.
Ingredients for Soft Gingerbread Cookie Recipe
These ingredients are for a classic soft gingerbread cookie recipe, designed to be chewy and flavorful. Let’s break it down:
Fats and Sugars:
1 cup (2 sticks) unsalted butter, softened: This creamed butter will trap air, making the cookies light and fluffy.
1 cup light brown sugar: Adds sweetness and a touch of moisture. Brown sugar also contains molasses, which contributes to the classic gingerbread flavor.
Wet Ingredients:
1 large egg: Binds the ingredients together and adds richness.
1/2 cup unsulphured molasses: This is the heart of the gingerbread flavor. It’s dark, concentrated, and adds a bit of spiciness. Choose unsulphured for the best taste.
1 tablespoon apple cider vinegar: Activates the baking soda and adds a tangy depth of flavor that balances the sweetness.
1 teaspoon vanilla extract: Enhances all the other flavors and adds a touch of warmth.
Dry Ingredients:
2 1/2 cups all-purpose flour: Provides the structure for the cookies.
2 teaspoons ground ginger: The star of the show! This is what gives gingerbread its distinctive flavor.
2 teaspoons ground cinnamon: A warm and familiar spice that complements the ginger perfectly.
1 teaspoon ground cloves: Adds a bit of heat and complexity to the spice blend.
1/2 teaspoon salt: Balances the sweetness and enhances all the other flavors.
These specific amounts and ingredients create a soft and chewy gingerbread cookie. If you prefer a crispier cookie, you could use less molasses or brown sugar, or bake them for a few minutes longer.
Instructionson Soft Gingerbread CookieRecipe
1. Preheat and Prep:
Preheat the oven to 350°F (175°C): This ensures the cookies bake evenly and achieve the desired texture.
Line a baking sheet with parchment paper: This prevents sticking and makes cleanup easier.
2. Cream Butter and Sugar:
Cream together softened butter and brown sugar until light and fluffy: This incorporates air into the mixture, leading to chewier cookies. Use a hand mixer or electric mixer for best results.
Beat in the egg, molasses, vinegar, and vanilla extract: These add moisture, flavor, and chewiness. Ensure everything is well combined.
3. Dry Ingredients:
Whisk together flour, ginger, cinnamon, cloves, and salt: This ensures even distribution of spices and avoids pockets of unseasoned dough.
Gradually add dry ingredients to wet ingredients: This helps prevent overmixing, which can make the cookies tough. Mix until just combined, not beyond.
4. Bake and Cool:
Drop rounded tablespoons of dough onto the baking sheet: Use a cookie scoop for consistent size and shape.
Bake for 10-12 minutes: This timing should result in soft, slightly browned cookies. Adjust baking time if needed based on your oven.
Let cool on the baking sheet for a few minutes: This allows the cookies to set before transferring them to a wire rack to cool completely.
Additional Tips on Soft Gingerbread Cookie Recipe
Here are some of the best tips on Soft Gingerbread Cookie Recipe that you must know to take your baking to whole new level:
Use quality ingredients, especially fresh ginger and molasses, for the best flavor.
Don’t overbake! The cookies should be soft and slightly puffed, not hard and dry.
Let the cookies cool completely before decorating or storing.
Baking Time
The baking time for gingerbread cookies will depend on how chewy or crispy you prefer them to be. For chewier cookies, bake for 10 minutes. For crispier cookies, bake for 12 minutes.
Vinegar Substitution
If you don’t have apple cider vinegar, you can use white wine vinegar instead. Both types of vinegar have a similar acidity level and will not significantly impact the flavor of the cookies.
Additional Spices
Gingerbread cookies are traditionally flavored with ginger, cinnamon, and cloves. However, you can also add other spices to your cookies, such as nutmeg or allspice.
Nutmeg has a warm, slightly peppery flavor that pairs well with ginger. Allspice is a combination of cinnamon, cloves, and nutmeg, and it adds a depth of flavor to gingerbread cookies.
Decorating
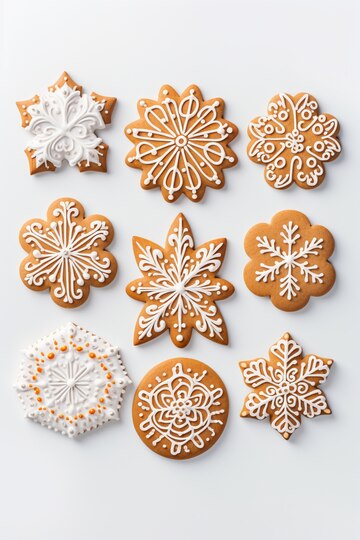
Once your soft gingerbread cookies are baked and cooled, you can decorate them with frosting, sprinkles, or candy.
Think of these Soft Gingerbread Cookies as a blank canvas and imagine yourself as an artist and let your imagination run wild as you decorate them.
This will not only make your cooking process fun but when you will eat these soft gingerbread cookies you will cherish the memories of the fun adventure you had in the kitchen 😉
Summary of Soft Gingerbread Cookie Recipe
This Soft Gingerbread Cookie Recipe is a delicious and festive treat that is perfect for the holiday season. This Soft Gingerbread Cookie Recipe is easy to make and can be enjoyed by people of all ages. So gather your ingredients, preheat your oven and get baking!
As the aroma of freshly baked Soft Gingerbread Cookie wafts through the air, a sense of warmth and nostalgia engulfs your heart. This Soft Gingerbread Cookie Recipe will melt on your tongue with their pillowy soft texture, leaving your taste buds dancing with a symphony of sweet and spicy flavors.
With every bite, you are transported to the heart of the holiday season and reunited with loved ones, sparkling lights and the spirit of giving.
This Soft Gingerbread Cookie Recipe is a culinary masterwork as well as a symbol of love and togetherness. They are an embodiment of the holiday spirit, uniting friends and family in the delight of making and consuming these delicious bites.
Generation after generation, the straightforward act of making and decorating these cookies develops into a treasured custom that promotes a sense of unity and belonging.
Therefore, as you set out on your gingerbread baking journey, let the comforting warmth of the oven embrace you and let the delightful scent of these holiday treats fill your house with happiness.
Every cookie is a tribute to the enduring spirit of the holiday season and the strength of small pleasures. Savor the warmth, love and nostalgia these delicious treats evoke with every bite, and allow the joyous spirit of gingerbread to fill your heart.
YOU MAY ALSO LIKE THESE – THESE TOPICS ARE RELATED TO THE CURRENT TOPIC WHICH IS “SOFT GINGERBREAD COOKIE RECIPE”
If you still have any questions, feel free to mention us in the comments section or explore the FAQs section.
OR
You can also contact us on our Facebook Page
Leftover gingerbread cookies can be crumbled and used as a topping for ice cream or yogurt. They can also be used to make gingerbread crumbs, which can be used in cakes, cookies and other desserts.
Yes, you can make gingerbread cookies without molasses. However, the cookies will not be as soft and chewy. You can substitute honey or maple syrup for molasses
Gingerbread cookies and ginger snaps are both made with ginger, but they have different textures. Gingerbread cookies are soft and chewy, while ginger snaps are hard and crispy.
Gingerbread Cookie Recipe Without Molasses That Will make People Begging for More
This easy to make Delicious and festive, Gingerbread Cookie Recipe Without Molasses is the ideal treat to have throughout the winter season. Molasses is included in the traditional gingerbread cookie recipe, giving the cookies their rich flavor and dark brown appearance. But there’s no need to worry if you don’t have any molasses on hand or if you want a molasses free option! This Gingerbread Cookie Recipe Without Molasses will make you crave for more
What Do I Need To Make Gingerbread Cookie without Molasses?
I’ll share all the equipment, ingredients and a detailed step by step guide on gingerbread cookie recipe without molasses. So, lets get started on this amazing journey to make the best Gingerbread Cookie without Molasses
Kitchen tools required to make Gingerbread Cookie Without Molasses
Before embarking on journey for making your Gingerbread Cookie Recipe Without Molasses, you’ll need the following kitchen tools:
Mixing bowls
Measuring cups and spoons
Electric mixer
Rolling pin
Cookie cutters
Baking sheet
Parchment paper
Ingredients Used For Making Gingerbread Cookie Recipe Without Molasses
Here are some easy to find Ingredients Used For Making Gingerbread Cookie Recipe Without Molasses:
2 1/2 cups all-purpose flour: This is the base of the cookie dough and provides structure.
2 teaspoons ground ginger: Ginger is the primary spice in gingerbread cookies and gives them their characteristic flavor.
1 teaspoon ground cinnamon: Cinnamon is a warm and aromatic spice that complements the ginger.
1/2 teaspoon ground nutmeg: Nutmeg adds a subtle sweetness and depth of flavor to the cookies.
1 teaspoon baking soda: Baking soda is a leavening agent that helps the cookies rise and become soft.
1/4 teaspoon salt: Salt enhances the sweetness of the cookies and balances the flavors.
1 cup (2 sticks) unsalted butter, softened: Butter provides richness, flavor, and tenderness to the cookies. It needs to be softened at room temperature so that it can be easily creamed with the sugar.
1 cup granulated sugar: Sugar sweetens the cookies and helps them brown nicely in the oven.
1 large egg: Eggs bind the ingredients together and add moisture to the dough.
1/4 cup honey: Honey adds sweetness and moisture to the cookies, and it also helps to caramelize them, giving them a richer flavor and deeper color.
Step by Step Guide on Gingerbread Cookie Recipe Without Molasses
Now the fun part of making of Gingerbread Cookie Recipe Without Molasses begins!
Step 1: Preheat the Oven
Before you begin mixing the dough, it’s important to preheat the oven to 350 degrees Fahrenheit (175 degrees Celsius). This ensures that the oven has enough time to reach the correct temperature for baking the cookies evenly. Preheat ovens can vary in accuracy, so using an oven thermometer is recommended to ensure the oven is at the correct temperature.
Step 2: Combine Dry Ingredients
In a medium-sized bowl, whisk together the flour, baking soda, nutmeg, cinnamon, ginger, and salt. This step ensures that the spices are evenly distributed throughout the dough, resulting in a consistent flavor profile across all the cookies.
Step 3: Cream Butter and Sugar
In a large bowl, use an electric mixer or a wooden spoon to beat the butter and sugar until they are light and creamy. This step incorporates air into the dough, making the cookies soft and chewy. The butter should be at room temperature for optimal creaming.
Step 4: Incorporate Wet Ingredients
Add the egg and honey to the creamed butter and sugar mixture and beat until fully incorporated. The egg provides structure and moisture to the dough, while the honey adds sweetness and a subtle molasses-like flavor.
Step 5: Gradually Add Dry Ingredients
Gradually add the dry ingredients to the wet ingredients, mixing until just combined. Avoid overmixing, as this can toughen the cookies. Use a spatula or wooden spoon to gently fold the dry ingredients into the wet ingredients until a cohesive dough forms.
Step 6: Roll Out Dough
Lightly flour a clean surface and roll out the dough to a thickness of 1/4 inch. Use a rolling pin that is dusted with flour to prevent the dough from sticking to the surface. Rolling the dough to an even thickness ensures consistent baking across all the cookies.
Step 7: Cut Out Cookie Shapes
Using your desired cookie cutters, cut out shapes from the rolled-out dough. Choose a variety of shapes to add visual interest and fun to your gingerbread cookies. If you don’t have cookie cutters, you can use a sharp knife to cut out shapes freehand.
Step 8: Place Cookies on Baking Sheet
Transfer the cut-out cookies to an ungreased baking sheet. Place the cookies about an inch apart to allow for even baking and prevent them from sticking together.
Step 9: Bake Cookies
Bake the cookies in the preheated oven for 10 to 12 minutes, or until the edges are golden brown. Keep an eye on the cookies during baking to prevent overbaking. The baking time may vary slightly depending on the thickness of the cookies and the specific oven.
Step 10: Cool and Enjoy
Remove the cookies from the oven and let them cool on the baking sheet for a few minutes before transferring them to a wire rack to cool completely. Once cooled, the cookies are ready to be enjoyed!
Golden Tips on Gingerbread Cookie Recipe Without Molasses
Use these powerful Tips on Gingerbread Cookie Recipe Without Molasses and take your cooking to a whole new level:
1. Enhance the flavor with vanilla extract
Adding a teaspoon of vanilla extract to the dough will introduce a subtle yet delightful sweetness and warmth to your gingerbread cookies. Vanilla extract complements the spices in gingerbread perfectly, creating a harmonious flavor profile that is both comforting and sophisticated.
2. Create chewier cookies with dried fruits
For a chewier texture, incorporate 1/2 cup of chopped dried fruits, such as raisins or cranberries, into the dough. The dried fruits will not only add a pleasant chewiness but also introduce a burst of sweetness and a touch of tartness, balancing the warmth of the spices.
3. Improvise without cookie cutters
If you don’t have cookie cutters, fret not! Simply use a sharp knife to cut out desired shapes from the rolled-out dough. While cookie cutters provide precision and uniformity, a sharp knife offers flexibility and creativity. You can freehand shapes, cut out simple geometric shapes, or even create unique designs.
4. Unleash your creativity with decorations
Unleash your artistic flair by decorating the cooled cookies with icing, sprinkles, or other embellishments. Icing provides a canvas for intricate designs, while sprinkles add a touch of whimsy and color. You can also experiment with other decorations, such as edible glitter, candies, or nuts to create personalized and visually appealing treats.
5. Store for optimal freshness
To ensure your gingerbread cookies retain their freshness and delectable texture, store them in an airtight container at room temperature for up to five days. The airtight container will prevent the cookies from drying out and absorbing unwanted odors, preserving their flavor and quality.
WHAT CAN I USE INSTEAD OF MOLASSES IN GINGERBREAD COOKIES?
If you don’t have molasses, you can use a number of substitutes to make delicious gingerbread cookies recipe without molasses. Here are a few options:
Maple syrup: Maple syrup is a great substitute for molasses because it has a similar flavor and sweetness. Use 1/2 cup of maple syrup for every 1/4 cup of molasses.
Honey: Honey is another good substitute for molasses. It has a slightly different flavor than molasses, but it will still give your cookies a delicious ginger flavor. Use 1/4 cup of honey for every 1/4 cup of molasses.
Blackstrap molasses: Blackstrap molasses is a darker, thicker type of molasses that has a more intense flavor. If you like a stronger ginger flavor, you can use blackstrap molasses instead of regular molasses. Use 1/4 cup of blackstrap molasses for every 1/4 cup of molasses.
Treacle: Treacle is a type of molasses that is popular in the United Kingdom. It has a similar flavor to molasses, but it is slightly lighter in color. Use 1/4 cup of treacle for every 1/4 cup of molasses.
Dark corn syrup: Dark corn syrup can be used as a substitute for molasses, but it will not give your cookies the same flavor. However, it will still make delicious cookies. Use 1/4 cup of dark corn syrup for every 1/4 cup of molasses.
Summary of Gingerbread Cookie Recipe Without Molasses
Immerse yourself in the comforting aroma of freshly baked gingerbread cookie without molasses. A timeless treat that evokes the holiday spirit and brings back cherished memories. This Gingerbread Cookie Recipe Without Molasses unveils a symphony of flavors that will tantalize your taste buds and warm your heart.
You can make a delicious batch of Gingerbread Cookie Recipe Without Molasses that will satisfy even the pickiest eaters with a few easily found ingredients. With just a blend of spices such as ground ginger, cinnamon and cloves will transport you to a cozy winter wonderland.
Whether you share these Gingerbread Cookie Recipe Without Molasses with loved ones or indulge in their comforting embrace alone, let them be a reminder of the simple joys in life. With each bite you’ll be enveloped in a warm embrace of nostalgia and holiday cheer, creating memories that will last a lifetime.
YOU MAY ALSO LIKE THESE – THESE TOPICS ARE RELATED TO THE CURRENT TOPIC WHICH IS “GINGERBREAD COOKIE RECIPE WITHOUT MOLASSES”
If you still have any questions, feel free to mention us in the comments section or explore the FAQs section.
OR
You can also contact us on our Facebook Page
Classic gingerbread cookies are colored with dark molasses syrup. Since these were made with no molasses in this gingerbread cookie recipe, these cookies are pale.
Yes, you can substitute dark brown sugar for granulated sugar in the above recipe. This will give the cookies a richer flavor and a slightly different texture.
Yes, you can freeze the dough for up to 3 months. Simply roll out the dough, cut out the shapes and place them on a baking sheet lined with parchment paper. Freeze for 30 minutes or until solid, then transfer the frozen cookies to an airtight container. When you're ready to bake the cookies, preheat the oven to 350 degrees F (175 degrees C) and bake the frozen cookies for 10-12 minutes, or until the edges are golden brown.
One Bowl Gingerbread Cookies: Soft, Chewy which is Easy to Bake
In Gingerbread Cookie Recipe you will understand about people of all ages appreciate the traditional holiday delicacy of gingerbread cookie. These cookies frequently taste like molasses and are seasoned with ginger, cinnamon, cloves and nutmeg. Gingerbread cookies can be soft and chewy or they can be crisp and crunchy.
In the warmth of a cozy kitchen, the aroma of gingerbread cookies fills the air, conjuring up images of holiday cheer and family gatherings. The sweet scent of molasses intertwines with the inviting spices of ginger, cinnamon, cloves, and nutmeg, creating an irresistible symphony of flavors that beckons taste buds of all ages.
These delectable treats, with their soft and chewy texture, offer a delightful contrast to the crisp winter air. Each bite is a comforting hug, a heartwarming reminder of the simple pleasures of the season. Whether enjoyed plain or adorned with festive frosting and royal icing, gingerbread cookies embody the essence of holiday merriment.
This Gingerbread Cookie Recipe for one-bowl gingerbread cookie which is simple to follow and doesn’t need to be chilled. The cookies have a rich molasses flavor with a dash of spice and they’re chewy and soft. You can decorate them with your own frosting or royal icing.
Gingerbread Cookie Recipe Ingredients
To make these delectable Gingerbread Cookies we will follow the best and easiest guide of Gingerbread Cookie Recipe, you’ll need the following ingredients:
2 1/2 cups all-purpose flour
1 teaspoon baking soda
1/2 teaspoon salt
1 tablespoon ground ginger
1 tablespoon ground cinnamon
1/2 teaspoon ground cloves
1/4 teaspoon ground nutmeg
1 cup (2 sticks) unsalted butter, softened
3/4 cup packed light brown sugar
1/2 cup unsulphured molasses
1 large egg
1 teaspoon vanilla extract
Royal icing or your favorite frosting for decorating (optional)
How to Make The Best Gingerbread Cookies
Follow this foolproof Gingerbread Cookie Recipe, which will leave a lasting impression on the taste buds of those who savor it.
Step by Step Guide on Baking Gingerbread Cookies
Preheating the oven
Preheat the oven to 350 degrees F (175 degrees C). Line baking sheets with parchment paper. This will ensure that the cookies bake evenly and that they don’t stick to the baking sheets.
Parchment paper is a nonstick material that will help the cookies release easily from the pan.
Whisking flour, baking soda, salt…
In a large bowl whisk together flour, baking soda, salt, ginger, cinnamon, cloves and nutmeg. Combine all of the dry ingredients evenly.
The flour is the main structure of the cookie, while the baking soda is a leavening agent that will help the cookies rise. The salt helps to balance the sweetness of the cookies, while the ginger, cinnamon, cloves, and nutmeg are the spices that give gingerbread cookies their distinctive flavor.
Creaming butter and brown sugar
In a separate bowl cream together butter and brown sugar until light and fluffy. This will create a light and fluffy dough. The butter should be softened but not melted and the brown sugar should be packed into the measuring cup. Creaming the butter and sugar together will incorporate air into the dough, which will make the cookies soft and chewy.
Combining molasses with…
Beat in molasses, egg and vanilla extract until well combined. This step will add moisture and flavor to the dough. The molasses is a thick, dark syrup that will give the cookies their characteristic sticky texture and dark color. The egg will help to bind the ingredients together, while the vanilla extract will add a subtle flavor.
Dough made to perfection
Gradually add dry ingredients to wet ingredients, mix until just combined without overmixing the dough. Overmixing the dough will develop the gluten in the flour, which will make the cookies tough.
Placing the dough on baking sheets
Drop rounded tablespoons of dough onto prepared baking sheets, leaving about 2 inches of space between each cookie. This will give the cookies enough space to spread out as they bake. If the cookies are too close together, they will stick together and become misshapen.
Baking time
Bake for 10-12 minutes or until edges are golden brown and centers are set without overbaking them. Overbaking will make the cookies dry and hard.
Out of the oven
Let cookies cool on baking sheets for a few minutes before transferring to a wire rack to cool completely. This step is important because it will allow the cookies to cool down slightly before they are transferred to a wire rack. This will help to prevent the cookies from breaking.
Decorating the cookies
Once cookies are cooled, decorate with royal icing or your favorite frosting (if desired). This step is not necessary, but it is a fun way to add a personal touch to the cookies. Royal icing is a type of icing that hardens when it dries, while frosting is a type of icing that remains soft.
How Do I Keep My Gingerbread Cookies Super Soft and Chewy?
The secret to soft and chewy gingerbread cookies lies in a combination of proper baking technique and storage methods. In the following Gingerbread Cookie Recipe the crucial advice will help you keep your gingerbread biscuits incredibly chewy and soft:
Baking Techniques Gingerbread Cookies:
Underbake Slightly: The key to soft cookies is to slightly underbake them. Aim for a slightly gooey center when removing them from the oven, as they will continue to cook as they cool.
Use Molasses: Molasses contributes to the moist and chewy texture of gingerbread cookies. Ensure you use the right type of molasses, typically dark or unsulphured molasses, which provides a richer flavor and deeper color.
Avoid Overworking the Dough: Excessive kneading or mixing can toughen the dough, resulting in hard cookies. Mix the ingredients just until combined, avoiding over-processing.
Storage Method for Gingerbread Cookies:
Chill the Dough: Chilling the dough for at least 30 minutes or overnight helps firm it up and allows the flavors to meld, resulting in chewier cookies.
Store in Airtight Containers: Once baked, store your gingerbread cookies in an airtight container at room temperature. This prevents them from drying out and maintains their soft texture.
Freeze for Extended Freshness: For longer storage, consider freezing your gingerbread cookies. Place them in a freezer-safe container or bag, separated by parchment paper to prevent sticking. When ready to enjoy, thaw them at room temperature for a few hours.
How Do I Tell When Gingerbread Cookies are baked?
After following the above mentioned Gingerbread Cookie Recipe the edges of the gingerbread cookies should be golden brown and the centers should be set. You can also test the cookies are done by inserting a toothpick into the center of a cookie. If the toothpick comes out clean the cookies are baked.
Best Icing for The Perfect Gingerbread Cookies
Royal icing is the best icing for gingerbread cookies because it hardens and has a beautiful glossy finish. However, to enhance your Gingerbread Cookie Recipe you can also use your favorite frosting such as buttercream or cream cheese frosting.
More Tips on Making The Perfect Gingerbread Cookie Recipe
There is always room for improvements, to enhance the Gingerbread Cookie Recipe follow these amazing tips:
For a more intense molasses flavor: use dark molasses instead of light molasses.
If you don’t have all of the spices: you can substitute 2 teaspoons of ground gingerbread spice for the individual spices.
To make the cookies extrasoft and chewy: roll the dough out 1/4 inch thick.
If the dough is too sticky: add a little more flour one tablespoon at a time.
If the dough is too dry: add a little more molasses, one tablespoon at a time.
Let the cookies cool completely before decorating them.
Why Do I Love This Gingerbread Cookie Recipe?
I’m in love with this Gingerbread Cookie Recipe. It’s not only incredibly easy to follow there’s no need to refrigerate but it also produces incredibly soft and chewy cookies that entice the palate with their deep molasses flavor. These delicious treats are ideal for any holiday get-together, and you can let your imagination run wild when decorating them with any royal icing or frosting you choose. Another thing I love about these gingerbread gems is how versatile they are. These cookies can be used as a blank canvas for your culinary creativity, whether you prefer the traditional swirl of vanilla frosting or the sophisticated artistry of royal icing.
Summary Of Gingerbread Cookie Recipe
Gingerbread Cookie Recipe provides a tasty and festive dessert that’s ideal for the holidays are gingerbread cookies. These simple one-bowl cookies have a rich molasses flavor and are chewy and moist. Everyone will find the cookies to be a festive and enjoyable treat when they are decorated with their preferred frosting or royal icing.
YOU MAY ALSO LIKE THESE – THESE TOPICS ARE RELATED TO THE CURRENT TOPIC WHICH IS “GINGERBREAD COOKIE RECIPE”
If you still have any questions, feel free to mention us in the comments section or explore the FAQs section.
OR
You can also contact us on our Facebook Page
Store your gingerbread cookies in an airtight container at room temperature for up to 5 days.
For longer storage, you can freeze your gingerbread cookies in an airtight container for up to 3 months. The cookies can be thawed at room temperature for about 1 hour before decorating.
For the above mentioned Gingerbread Cookie Recipe you'll need the following tools and equipment:
• Mixing bowls
• Measuring cups
• Rolling pin
• Cookie cutters
• Baking sheets
• Parchment paper
• Toothpick
• Wire rack
• Spoon
• Royal icing or your favorite frosting
Yes, you can use this Gingerbread Cookie Recipe to make gingerbread houses. The dough is a bit softer than traditional gingerbread house dough but it is still pliable enough to form into walls and roofs.
To roll out gingerbread cookie dough, lightly flour a surface and your rolling pin. Roll out the dough to 1/4 inch thick. If the dough is too sticky, add a little more flour, one tablespoon at a time.
To freeze gingerbread cookies, place them in an airtight container and freeze for up to 3 months. Thaw them overnight in the refrigerator before decorating.
Yes, you can reroll the scraps of gingerbread cookie dough to make more cookies. Just keep in mind that the dough may be a bit more crumbly after rerolling, so be careful not to overmix it.
Yes, these cookies can also be made as drop cookies. Simply spoon rounded tablespoons of dough onto ungreased baking sheets and bake for 10-12 minutes, or until edges are golden brown and centers are set.
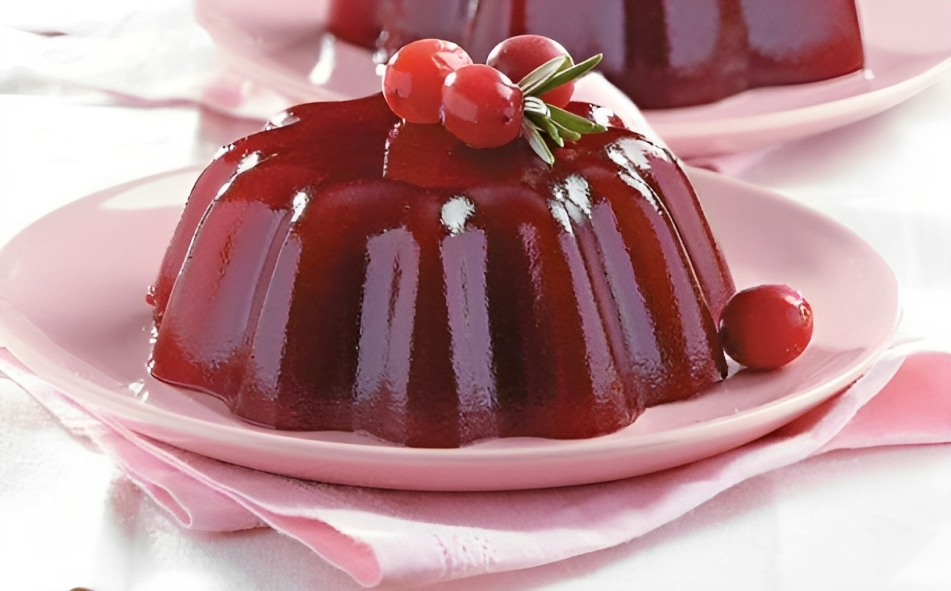
A Culinary Delight: Mastering the Art of Jellied Cranberry Sauce
About Jellied Cranberry Sauce Recipe
The holidays are a time to gather loved ones around the table, savor delectable culinary creations and forge memories that will last a lifetime.
And what better way to adorn your Thanksgiving or Christmas table than with a glistening homemade jellied cranberry sauce? This quintessential side dish has captivated palates for generations, adding a touch of tartness, sweetness and vibrant color to your holiday feasts.
Just imagine the cranberry sauce shimmering like ruby jewels amidst a spread of festive dishes, its glistening surface reflecting the warm glow of candlelight. As you spoon a dollop onto your plate, you’ll notice the tantalizing aroma of cranberries, sugar, and a touch of spice wafting through the air.
Each bite bursts with a symphony of flavors – the tartness of cranberries balanced perfectly by the sweetness of sugar, complemented by a hint of spice that lingers on the tongue 😋
This Recipe for Jellied Cranberry Sauce is quite sophisticated for such a simple dish. Smooth and colorful sauce is made from fresh cranberries that are plump and full of flavor. They are cooked gently in a harmonious mixture of sugar and water until they release their juices. Warmth and complexity are added to the flavor profile by incorporating a hint of spice, like cloves or cinnamon.
As the sauce cools, it takes on a mesmerizing jelly-like consistency, reminiscent of stained glass windows, its ruby hues reflecting the light as it dances across the table. This transformation adds an element of elegance and sophistication to your holiday spread, transforming a humble side dish into a work of culinary art 👌
Whether you’re a seasoned cook or a novice in the kitchen, crafting your own jellied cranberry sauce is a delightful holiday tradition that will bring joy to your table and memories to your heart. With each spoonful, you’ll savor the flavors of the season, the warmth of family, and the simple pleasures of home-cooked goodness.
History of Jellied Cranberry Sauce
The Recipe For Jellied Cranberry Sauce dates back to Native American cuisine and it has been a mainstay of holiday tables for centuries. Native to North America, cranberries were valued for their colorful flavor and therapeutic qualities. Cranberries were first used by European settlers who used them in a variety of recipes such as the jellied cranberry sauce we eat today.
The Perfect Balance of Sweet and Tart
The unique synergy of tart and sweet flavors in Jellied Cranberry Sauce is what makes it so appealing. The natural tartness of the cranberries is enhanced by the sugar which results in a flavorful combination that entices the palate. The vivid red hue of the sauce gives a celebratory vibe to any meal and enhances its visual appeal.
What do I Need To Make Jellied Cranberry Sauce?
While store bought Jellied Cranberry Sauce is readily available, there’s nothing quite like the satisfaction of preparing this holiday staple from scratch. The process is simple yet rewarding, allowing you to customize the flavor profile to your liking.
Making Jellied Cranberry Sauce at home ensures that you are using highest quality ingredients and not adding any artificial ingredients that are harmful to your health
Equipment Required For Making Jellied Cranberry Sauce
To make Jellied Cranberry Sauce Recipe, you’ll need a few basic kitchen tools:
Medium saucepan: To simmer the cranberries, sugar and water
Measuring cups and spoons: To accurately measure the ingredients for the recipe.
Wooden spoon or spatula: To stir the cranberries and sugar as they simmer and to mash the cranberries to the desired consistency.
Fine mesh sieve (optional): To make a smoother sauce and remove any remaining cranberry skins and seeds.
What Ingredients Do I Need To Make Jellied Cranberry Sauce?
To embark on your Jellied Cranberry Sauce journey, you’ll need these handful of ingredients:
12 ounces fresh cranberries (about 3 cups)
1 cup granulated sugar
1 cup water
Optional ingredients:
1 tablespoon orange zest
1 cinnamon stick
¼ teaspoon ground ginger
Step by Step Process Of Making The Perfect Jellied Cranberry Sauce
With your ingredients assembled, it’s time to transform them into a culinary masterpiece:
Rinse the cranberries thoroughly under running water to remove any debris.
In a medium saucepan, combine the cranberries, sugar, and water. Bring the mixture to a boil over medium-high heat, stirring occasionally to dissolve the sugar.
Once boiling, reduce the heat to medium-low and simmer for 10-15 minutes, or until the cranberries have burst and the sauce has thickened.
Add your desired optional ingredients, such as orange zest, cinnamon sticks, or ground ginger during the simmering process.
For a smoother sauce, strain the cranberry mixture through a fine-mesh sieve, removing any remaining cranberry skins and seeds.
Allow the sauce to cool completely at room temperature.
Once the sauce has cooled down, transfer it into a mold or you can use a bowl if you don’t have any mold.
Refrigerate it for at least 2 hours or preferably overnight, to allow it to gel properly. Cranberry sauce that has been refrigerated will solidify into a jelly-like consistency that is ideal for cutting and serving.
Tips for Unmolding Your Jellied Cranberry Sauce
This is my favorite part, once your cranberry jelly is completely set and prepared for serving, there are a few tips to help you unmold it flawlessly.
Use the sink to fill a big bowl or pot with hot water. For at least five seconds, submerge your chilled jelly mold in the water bath.
Flip the mold over right away onto your serving platter. Warm the mold in the water bath if it doesn’t release.
If you plan on moving your Jellied Cranberry Sauce after unmolding, it’s best to unmold it onto a wet surface by splashing some water on your plate, this will prevent the jelly from sticking.
Serving Suggestions
This Jellied Cranberry Sauce Recipe is a versatile condiment that pairs beautifully with a variety of dishes. Here are some suggestions:
Thanksgiving and Christmas turkey: The tartness of the cranberry sauce complements the richness of roasted turkey, creating a delightful contrast in flavors.
Roast pork or ham: The sweetness of the cranberry sauce balances the savory flavors of roast pork or ham, adding a touch of acidity and vibrancy.
Cheese platters: The tangy cranberry sauce adds a delightful contrast to the creamy richness of cheeses, such as brie or cheddar.
Dessert pairings: Jellied cranberry sauce can be a surprising yet delicious addition to desserts, such as vanilla ice cream, cheesecake, or pound cake.
Nutritional Benefits Of Cranberry
Cranberries are not only a culinary delight but also a nutritional powerhouse. They are packed with antioxidants, including polyphenols, which help protect cells from damage and may reduce the risk of chronic diseases. Cranberries are also a good source of vitamin C, which supports immune function and collagen production.
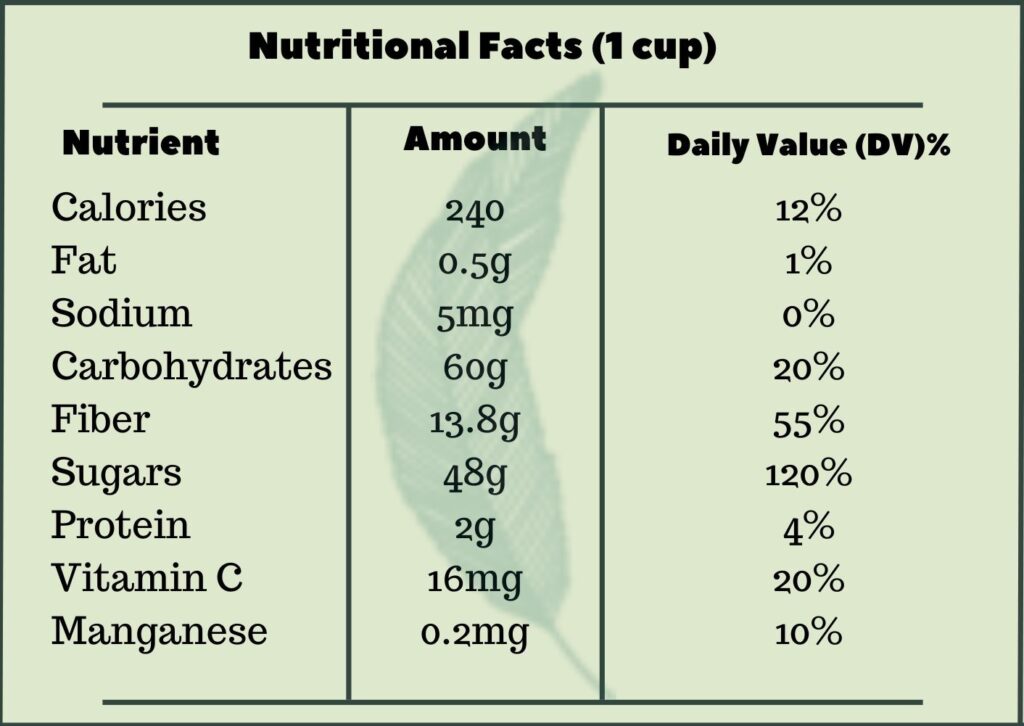
In addition, cranberries are a low-calorie fruit, making them a healthy snack option. One cup of cranberries contains only 46 calories and 4 grams of fiber. Fiber helps you feel full and satisfied, which can help you manage your weight.
Cranberries are also a good source of other nutrients, including:
Manganese: Manganese is important for bone health and blood sugar control.
Copper: Copper is important for energy production and immune function.
Vitamin E: Vitamin E is an antioxidant that helps protect cells from damage.
Vitamin K1: Vitamin K1 is important for blood clotting.
Cranberries can be enjoyed in a variety of ways. They can be eaten fresh, dried, or juiced. They can also be used in sauces, jams, and jellies.
Here are some of the potential health benefits of cranberries:
May help prevent urinary tract infections (UTIs): Cranberries contain compounds that may help prevent bacteria from sticking to the walls of the urinary tract, which can lead to UTIs.
May promote heart health: Cranberries may help improve blood vessel function and reduce LDL (bad) cholesterol levels.
May boost immunity: Cranberries are a good source of vitamin C, which is an important nutrient for immune function.
May help protect against cancer: Cranberries contain antioxidants that may help protect cells from damage caused by free radicals, which can lead to cancer.
Overall, cranberries are a healthy and nutritious fruit that can be enjoyed as part of a balanced diet.
Nutritional Facts of Jellied Cranberry Sauce
Please note that these are just estimates and the actual nutritional content of your food may vary depending on the specific ingredients and preparation methods used.
Summary of Recipe for Jellied Cranberry Sauce
Jellied Cranberry Sauce is a quintessential side dish that has captivated palates for generations. Its vibrant color and harmonious blend of tart and sweet flavors make it a delightful addition to holiday feasts. Whether you’re a seasoned cook or a novice in the kitchen, crafting your own jellied cranberry sauce is a rewarding culinary experience that will bring joy to your table and memories to your heart.
This Recipe For Jellied Cranberry Sauce is more than just a side dish, it’s a culinary expression of holiday cheer. Its presence on the table evokes memories of family gatherings, laughter and the warmth of the season. As you savor its tart and sweet flavors, take a moment to appreciate the rich history and culinary legacy of this beloved condiment.
Creating your own Jellied Cranberry Sauce is a simple yet rewarding culinary endeavor. With just a few basic ingredients and a handful of easy steps, you can transform fresh cranberries into a delectable condiment that will elevate your holiday meals.
So, this holiday season invite Jellied Cranberry Sauce to your table and let its vibrant color, harmonious flavors, and delightful texture add a touch of magic to your celebrations. With each spoonful, you’ll create memories that will last a lifetime.
YOU MAY ALSO LIKE THESE THESE TOPICS ARE RELATED TO THE CURRENT TOPIC WHICH IS“RECIPE FOR JELLIED CRANBERRY SAUCE”
If you still have any questions, feel free to mention us in the comments section or explore the FAQs section.
OR
You can also contact us on our Facebook Page
If you prefer a sweeter cranberry sauce, adjust the amount of sugar to your liking. You can also add a pinch of baking soda to neutralize the tartness slightly.
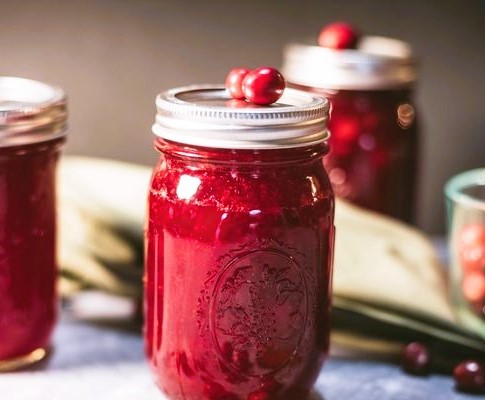
Cranberry Sauce Canning Recipe: A Culinary Masterpiece
A mainstay of Thanksgiving and holiday meals, cranberry sauce is a tart and sweet condiment that goes well with roasted meats and poultry.
Why not make it yourself and store it for future use?
Although store bought cranberry sauce is more convenient, Homemade Cranberry Sauce is superior in terms of flavor and satisfaction. This Cranberry Sauce Recipe can be preserved for a year, best part is this is beginner friendly and a satisfying process.
Just Imagine your guests come over and everyone is gathered on the table sharing their stories and laughter while enjoying this cranberry sauce recipe and when they are about to leave you give them your homemade canned cranberry sauce. It will leave a smile on their face because this Thanksgiving or Christmas is all about giving.
Just like that I will give you all the tips and tricks that I learned from my years of experience. I will not only be sharing Canning process but as well as my popular Cranberry Sauce Recipe. So, let’s get on a journey where we will learn all about why canning is important and how its actually done.
Why process cranberry sauce for canning?
There are various benefits to canning cranberry sauce as opposed to buying store bought.
Canning gives you complete control over the ingredients and guarantees that artificial additives and preservatives are not present in your cranberry sauce.
Cranberries are a seasonal treasure, often grace our tables during the festive months of autumn and winter. Canning offers a time-honored method of preserving this ephemeral bounty.
Allowing you to savor the essence of the season throughout the year. By canning cranberry sauce, you not only safeguard the fruits of your labor but also embrace a thrifty approach to cooking, minimizing food waste and maximizing your savings.
With our minds racing with an endless number of tasks, the hustle and bustle of holiday preparations can often leave us feeling overwhelmed.
Cranberry sauce can be preserved ahead of time and is a culinary lifesaver, providing a prepared side dish that reduces the anxiety associated with hurried preparations. When you keep jars of homemade cranberry sauce in your pantry, you can easily dress up your holiday meals and make sure your guests are served a delicious and authentic meal.
Supplies required for Canning Cranberry Sauce
Before embarking on your Homemade Cranberry Sauce Canning adventure, ensure you have the necessary equipment and ingredients:
Canning Supplies
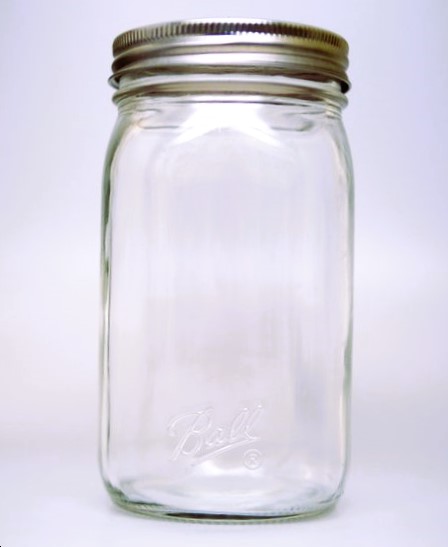
Canning jars and lids: Canning jars are made of thick glass that can withstand the high temperatures of the canning process. They are also designed to seal tightly with lids to prevent bacteria from entering the jars. Try to use wide mouth jars instead of using a tapered jar as wide mouth jars are easy to open
Wide-mouth jar opener: A wide-mouth jar opener is used to open canning jars that have been sealed. The opener has a strong grip that can make removal easy.
Canning rack: A canning rack is used to hold the canning jars in place while they are being processed in a boiling water bath or pressure canner. This helps to prevent the jars from bumping into each other and breaking.
Canning jar lifter: A canning jar lifter is used to safely remove hot canning jars from the boiling water bath or pressure canner. The lifter has a long handle that keeps your hands away from the heat, and it has a gripper that securely holds the jars.
Funnel: A funnel is used to guide the cranberries into the canning jars without spilling. This helps to prevent the cranberries from touching the outside of the jars, which could prevent them from sealing properly.
How to make Cranberry Sauce?
This easy to make Cranberry Sauce Recipe will leave everyone licking their fingers and asking for more. So, lets get started on making the best Cranberry Sauce by following these simple steps:
Rinsing the cranberries removes any dirt or debris that may be present on the surface, you can use a colander. Discard any damaged or bruised cranberries will ensure that only the highest quality cranberries are used in the sauce.
Take a medium saucepan and put it over medium-low heat. Cook the cranberries in a combination of sugar and water as it breaks down their cell walls, releasing their natural juices and creating a sweet and tart sauce. Stirring occasionally, until the cranberries have popped and the sauce has thickened. The cooking time for cranberry sauce will depend on the desired texture. For a smooth sauce, cook for about 10 minutes. For a chunkier sauce, cook for 5-7 minutes. Don’t overcook your cranberry sauce or else it will become mushy.
Remove from heat and stir in any optional mix-ins such as orange zest, cinnamon or chopped nuts.
Allowing the sauce to cool slightly before serving prevents burns and makes it easier to handle.
Making Homemade Cranberry Sauce is a culinary adventure that offers endless opportunities for exploration and creativity. Instead of settling for the traditional recipe, why not embark on a journey of culinary experimentation and infuse your cranberry sauce with unique flavors and textures? Let your imagination be your guide as you venture into the realm of unconventional ingredients and tantalizing combinations.
Important Notes
Everyone’s preference of cranberry sauce is different. Here are a few things you can change to your linking:
For a sweeter sauce, add more sugar.
For a tarter sauce, add less sugar.
For a smoother sauce, mash or blend the cooked cranberries.
For a chunkier sauce, leave the cranberries whole.
Canning Process for Cranberry Sauce
How to Sanitize Jars and Lids
As we move forward to the Canning Process for Cranberry Sauce, make sure to Sanitize jars and Lids as it is crucial for home canning to ensure the safety and preservation of your food.
When canning cranberry sauce start by gathering canning jars, lids and rings. Ensure they are clean and free of debris.
Wash jars and lids thoroughly in hot soapy water and make sure to rinse well.
Place jars and lids in a deep pot or dishwasher on a high heat setting. Cover with water and bring to a boil.
Boil for 10 minutes to Sanitize jars and Lids. Keep jars and lids in the hot water until ready to use.
Sanitize rings by placing them in boiling water for 5 minutes.
Rinse them thoroughly and allow them to air dry completely.
Preparing the Jars and Lids
Place the jars on a clean canning rack.
Fill the jars with hot cranberry sauce, leave about ½ inch of headspace at the top.
Remove any air bubbles by running a butter knife around the inside of the jar.
Wipe the jar rims with a clean, damp cloth to remove any excess sauce.
Step by Step on Sealing the Jars
Centering and Sealing the Lids
Place the lids on the jars and screw the bands down with your fingers only until they are snug. Do not overtighten the bands, as this can prevent the lids from sealing properly.
Processing the Jars
Fill a canner with enough water to cover the jars by at least 1 inch.
Bring the water to a rolling boil.
Carefully lower the jars into the boiling water using a jar lifter.
Process the jars for 15 minutes at a rolling boil.
After 15 minutes, turn off the heat and remove the jars from the canner using a jar lifter.
Cooling and Storage
Place the jars on a clean towel-lined surface and let them cool undisturbed for 24 hours.
Check the seals on the jars. The lids should be concave and tightly sealed. If any lids are not sealed, reprocess the jars for another 15 minutes.
Store the jars in a cool, dark place. Properly sealed jars of cranberry sauce will last up to 1 year.
Checking the Seals
Once the jars have cooled completely, check the seals to ensure they have formed properly. The lids should be concave and tightly sealed. If any lids are not sealed, reprocess the jars immediately.
Storing Your Homemade Cranberry Sauce
Store the sealed jars of cranberry sauce in a cool, dark place. Jars that are properly sealed can last up to 1 year.
Summary of Cranberry Sauce Canning Recipe
This is the best Homemade Cranberry Sauce Canning Recipe that is delicious and easy way to add a touch of warmth to your holiday meals. This Cranberry Sauce Canning Recipe is simple to follow and yields a delicious, tart and sweet sauce that is sure to please everyone at your table.
Canning your Homemade Cranberry Sauce is a great way to ensure that you always have a supply on hand and Canning Process for Cranberry Sauce is also a fun and rewarding experience. With just a few simple steps, you can create batches of Homemade Cranberry Sauce that will last for months.
So gather your supplies, follow this Cranberry Sauce Canning Recipe and enjoy the satisfaction of making your own Homemade Cranberry Sauce. Your family and friends will love you and remember the time you made them the best Cranberry Sauce, every time cranberry sauce is mentioned.
YOU MAY ALSO LIKE THESE THESE TOPICS ARE RELATED TO THE CURRENT TOPIC WHICH IS“CRANBERRY SAUCE CANNING RECIPE”
If you still have any questions, feel free to mention us in the comments section or explore the FAQs section.
OR
You can also contact us on our Facebook Page
You can adjust the sweetness of the cranberry sauce by adding more or less sugar. Start with the amount of sugar specified in the recipe and adjust it to taste.
The amount of sugar and cranberries needed for cranberry sauce can vary depending on personal preference but a general guideline is to use ½ cup of sugar for every 1 cup of cranberries. This will result in a sauce that is tart and sweet. If you prefer a sweeter sauce, you can increase the amount of sugar to ¾ cup or 1 cup.
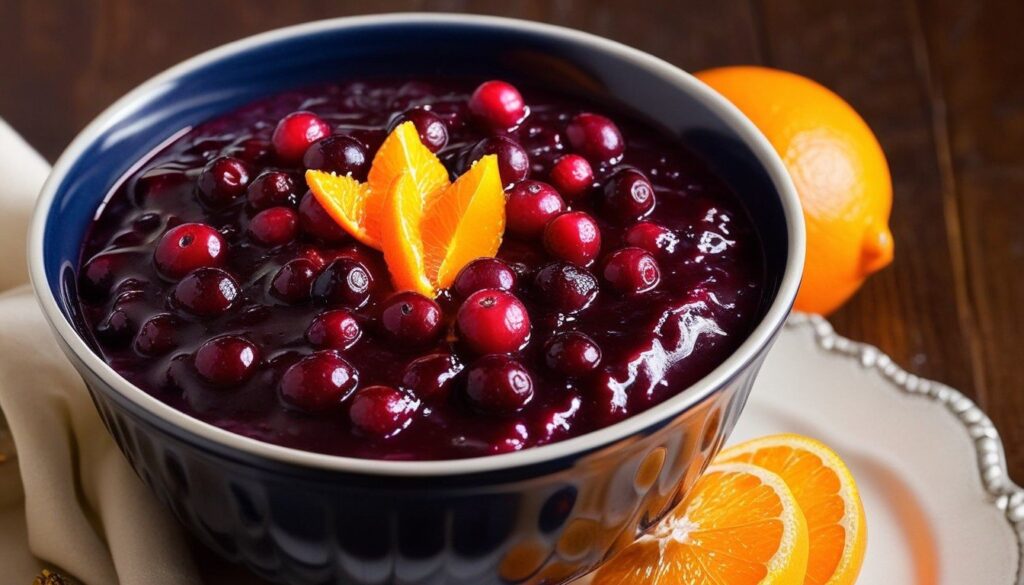
Cranberry sauce is a classic condiment that has graced Thanksgiving tables for generations. It is a simple yet flavorful accompaniment to roast turkey, stuffing and other holiday fare. While store bought cranberry sauce is readily available but nothing beats the taste of homemade cranberry sauce.
In this comprehensive guide on Cranberry Sauce Recipe, we’ll explore everything you need to know about making cranberry sauce from scratch. I will share tips for selecting ingredients, preparing the sauce and storing leftovers. This classic Cranberry Sauce Recipe will tantalized your taste buds.
About Fresh Cranberries
Cranberries are a versatile fruit native to North America. They are packed with nutrients, including antioxidants, vitamin C, and fiber. Cranberries are typically tart and acidic but when cooked with sugar they become sweet and tangy. Fresh cranberries are in season from late fall to early winter.
Cranberries can be enjoyed in a variety of ways including fresh, frozen, dried and as juice or sauce. They are a popular ingredient in holiday dishes, such as cranberry sauce and cranberry orange relish. Cranberries can also be used in savory dishes such as cranberry chutney and cranberry salsa.
Equipment Required
To make cranberry sauce, you’ll need a few basic kitchen tools:
Medium saucepan: To simmer the cranberries, sugar and water
Measuring cups and spoons: To accurately measure the ingredients for the recipe.
Wooden spoon or spatula: To stir the cranberries and sugar as they simmer and to mash the cranberries to the desired consistency.
Potato masher (optional): To mash the cranberries to make a chunkier sauce.
Food processor or blender (optional): To puree the cranberries for a smooth sauce.
Yes, you can use frozen cranberries to make cranberry sauce. There’s no need to thaw them before cooking. Just add them to the saucepan with the sugar and water.
How to Make Cranberry Sauce?
This easy to make Cranberry Sauce Recipe will leave everyone licking their fingers and asking for more. So, lets get started on making the best Cranberry Sauce by following these simple steps:
Rinsing the cranberries removes any dirt or debris that may be present on the surface, you can use a colander. Discard any damaged or bruised cranberries will ensure that only the highest quality cranberries are used in the sauce.
Take a medium saucepan and put it over medium-low heat. Cook the cranberries in a combination of sugar and water as it breaks down their cell walls, releasing their natural juices and creating a sweet and tart sauce. Stirring occasionally, until the cranberries have popped and the sauce has thickened. The cooking time for cranberry sauce will depend on the desired texture. For a smooth sauce, cook for about 10 minutes. For a chunkier sauce, cook for 5-7 minutes. Don’t overcook your cranberry sauce or else it will become mushy.
Remove from heat and stir in any optional mix-ins such as orange zest, cinnamon or chopped nuts.
Allowing the sauce to cool slightly before serving prevents burns and makes it easier to handle.
Serving Cranberry Sauce
This easy to make Cranberry sauce Recipe is a versatile condiment that can be served warm or at room temperature. It is traditionally served with roast turkey, but it can also be enjoyed with stuffing, mashed potatoes and other Thanksgiving dishes.
In addition to its traditional uses, cranberry sauce can also be used in a variety of other ways. It can be added to yogurt, oatmeal, or smoothies for a tart and healthy boost. It can also be used as a marinade for chicken or pork, or as a glaze for ham or salmon. Cranberry sauce can even be used in baking, such as in muffins, cakes and cookies.
Here are some ideas for how to use cranberry sauce in your cooking:
Add it to yogurt or oatmeal for a tart and healthy breakfast.
Stir it into smoothies for a boost of vitamins and antioxidants.
Use it as a marinade for chicken or pork.
Glaze ham or salmon with cranberry sauce for a festive touch.
Bake cranberry sauce into muffins, cakes or cookies.
No matter how you enjoy it, cranberry sauce is a delicious and versatile condiment that can add a touch of sweetness and tartness to any meal.
Important Notes
For a sweeter sauce, add more sugar.
For a tarter sauce, add less sugar.
For a smoother sauce, mash or blend the cooked cranberries.
For a chunkier sauce, leave the cranberries whole.
Should I Mash or Blend This Cranberry Sauce Recipe?
You can make this cranberry sauce recipe with a chunky or smooth texture in one of these two ways:
Smooth and Silky Cranberry Sauce If you prefer a smooth and silky cranberry sauce, embrace the mashing method. Once the cranberries have burst and softened, remove the saucepan from the heat. Allow the mixture to cool slightly then gently mash the cranberries using a potato masher or food processor. This will break down the cranberries, resulting in a uniform and velvety sauce.
Chunks of Cranberry Delight For those who enjoy the delightful burst of texture that comes from whole cranberries, opt for a chunkier approach. Instead of mashing the cooked cranberries, allow them to cool slightly, then gently stir them to preserve their shape. This will leave you with a cranberry sauce brimming with bursts of tartness and pops of texture.
Make-Ahead Instructions
This Cranberry Sauce Recipe can be made ahead of time and reheated before serving. To make ahead, simply follow the recipe above and let the sauce cool completely. Then transfer the sauce to an airtight container and refrigerate for up to 5 days.
Storage Options
How Do I Store Cranberry Sauce?
Storing Leftover Cranberry Sauce
This Cranberry Sauce Recipe is a versatile condiment that can be enjoyed with a variety of dishes, from roasted turkey to grilled cheese sandwiches. Whether you’ve made it yourself or purchased it from the store, proper storage is essential to ensure its safety and quality.
This Cranberry Sauce Recipe can be stored in an airtight container in the refrigerator for up to 5 days.
Safety Tips
When handling this cranberry sauce recipe, always follow proper hygiene practices to prevent the spread of bacteria. Wash your hands thoroughly with soap and water before and after handling the sauce. Avoid using utensils that have touched raw meat or poultry to prevent cross-contamination.
If you notice any signs of mold or off-odors in your cranberry sauce, discard it immediately. Do not consume cranberry sauce that has been stored at room temperature for more than two hours.
By following these simple storage guidelines, you can ensure that your cranberry sauce remains safe and delicious for your Thanksgiving feast or any other occasion.
How to Freeze Cranberry Sauce?
This Cranberry Sauce Recipe is a staple condiment for Thanksgiving and holiday dinners can be conveniently preserved for later enjoyment by freezing. This versatile condiment freezes exceptionally well, retaining its tartness and vibrant color for up to three months. To ensure optimal preservation, follow these simple steps:
Allow the cranberry sauce to cool completely: Before freezing, ensure the cranberry sauce has cooled thoroughly to room temperature. This prevents hot sauce from expanding and potentially breaking the container during freezing.
Choose an airtight container or freezer-safe bag: Select an airtight container or a heavy duty freezer safe bag to store the cranberry sauce. These containers effectively prevent freezer burn and preserve the sauce’s texture and flavor.
Transfer the cooled sauce: Carefully transfer the cooled cranberry sauce into the chosen container or bag, leaving some headspace to allow for expansion during freezing.
Label and date the container: Clearly label the container or bag with the contents, including the type of cranberry sauce (homemade or canned) and the date of freezing. This information helps keep track of the sauce’s freshness and ensures it’s consumed within the recommended timeframe.
Freeze promptly: Place the labeled container or bag in the freezer as soon as possible. Prompt freezing helps maintain the sauce’s quality and prevents spoilage.
How Do I Unfreeze Cranberry Sauce?
This Cranberry Sauce Recipe is easy to unfreeze, simply transfer the container or bag from the freezer to the refrigerator overnight or for at least a couple hours. When you thaw them, they’ll release some moisture. So make sure to strain them and dry them with a paper towel.
Alternatively, you can use a microwave oven for thawing Cranberry Sauce by following steps:
Step 1: Place the frozen cranberry sauce in a microwave-safe container.
Ensure the container is completely microwave-safe and can withstand the heat of the microwave without melting or warping.
Step 2: Set the microwave to low power.
Low power is recommended to ensure even thawing and prevent the sauce from splattering or overcooking.
Step 3: Microwave the sauce in short intervals.
To prevent overheating and uneven thawing, start with short bursts of microwave power, about 30 seconds to 1 minute at a time.
Step 4: Stir the sauce after each interval.
Stirring the sauce after each microwaving interval helps to distribute the heat evenly and prevents any hot spots from forming.
Step 5: Continue microwaving and stirring until the sauce is thawed.
The thawing time will vary depending on the quantity of cranberry sauce and the power of your microwave. Keep an eye on the sauce and stir it frequently to ensure even thawing.
Step 6: Once the sauce is thawed, check its consistency.
If the sauce seems too thick, you can add a small amount of water or orange juice to adjust its consistency.
Step 7: Allow the sauce to cool slightly before serving.
Microwaving can cause the sauce to become slightly warm, so allow it to cool slightly before serving to prevent any burns.
Once thawed, the cranberry sauce can be stored in the refrigerator for up to a week.
Is This Cranberry Sauce Recipe gluten free?
All ingredients in this Cranberry Sauce Recipe are naturally gluten-free.
Nutrition Information of Cranberry Sauce Recipe
One serving of cranberry sauce (1/4 cup) contains approximately:
Calories: 60
Fat: 0g
Sugar: 15g
Fiber: 1g
Vitamin C: 10% DV
Summary
The aroma this Cranberry Sauce Recipe will fill your home with sweet and tangy aroma that mingles with the savory scents of roasting turkey and warm gravy. The cranberries dance in the saucepan as they burst forth with their tartness, their juices mingling with the sweetness of sugar and the warmth of cinnamon. A splash of orange zest adds a zesty note, while a touch of ginger brings a hint of spice.
As the cranberries simmer and soften, their vibrant crimson hue deepens, filling the kitchen with a rich and inviting glow. The sauce thickens, its texture becoming smooth and velvety, a perfect complement to the rich and savory flavors of the Thanksgiving feast.
With each spoonful of this easy to make cranberry sauce, you savor the essence of the season, the tartness of the cranberries tempered by the sweetness of sugar and the warmth of spices. It’s a taste of home, a lovely reminder of family and friends gathered around the table, sharing stories and laughter.
Whether you prefer your cranberry sauce smooth or chunky, sweet or tart this Cranberry Sauce Recipe is sure to bring a touch of warmth and cheer to your Thanksgiving table. So gather your loved ones, set the table and let the cranberries fill your home with their sweet and tangy magic.
YOU MAY ALSO LIKE THESE THESE TOPICS ARE RELATED TO THE CURRENT TOPIC WHICH IS“CRANBERRY SAUCE RECIPE”
If you still have any questions, feel free to mention us in the comments section or explore the FAQs section.
OR
You can also contact us on our Facebook Page
Yes, you can use frozen cranberries to make cranberry sauce. There is no need to thaw them before cooking. Just add them to the saucepan with the sugar and water.
The basic ingredients in cranberry sauce are cranberries, sugar and water. Optional ingredients include orange zest, lemon zest, cinnamon, nutmeg and allspice.
To make cranberry sauce, simply combine the cranberries, sugar and water in a medium saucepan and bring to a boil. Reduce heat and simmer for 10-15 minutes or until the cranberries have popped and the sauce has thickened. Stir in any optional ingredients such as orange zest or cinnamon.
Yes, cranberry sauce can be frozen up to 3 months. To freeze cranberry sauce, simply let it cool completely then transfer it to an airtight container or freezer safe bag.
Cranberries are a good source of vitamin C and fiber. They also contain antioxidants, which can help protect your cells from damage caused by free radicals.
Culinary Craftsmanship: Unveiling the Art of Recipe Organization
Overview of How do chefs organize recipes?
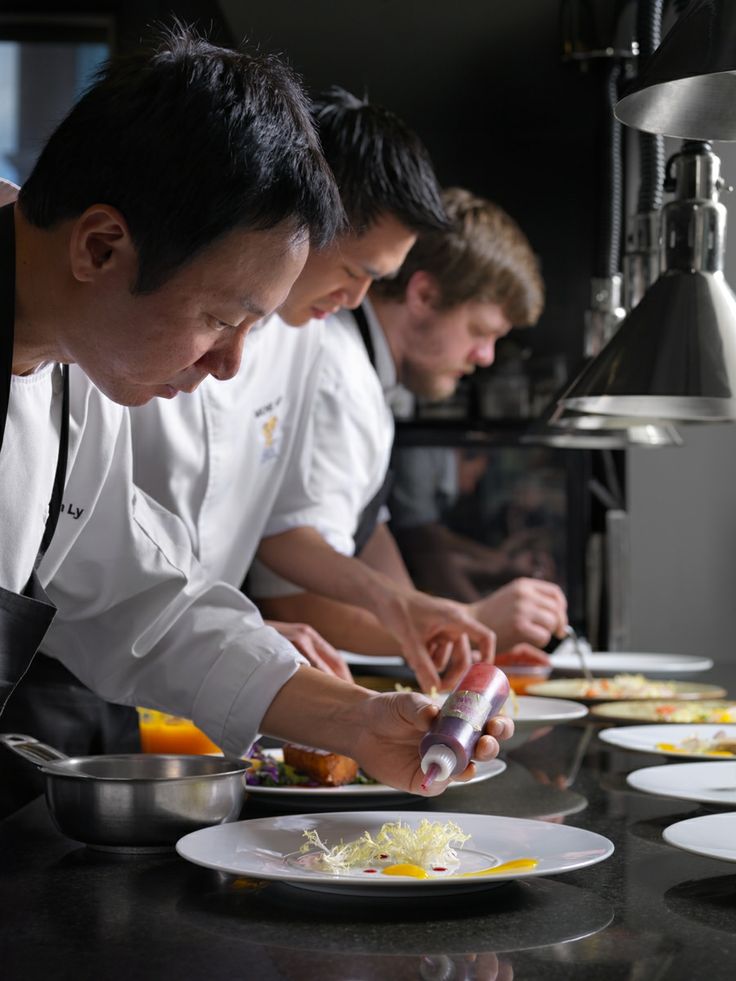
In How do chefs organize recipes? we will cover the bustling realm of professional kitchens where culinary artistry intertwines with the precision of time and technique chefs skillfully navigate through their extensive repertoire of recipes meticulously curated and organized for seamless execution. Whether its a time honored dish passed down through generations or a modern innovation born from culinary exploration each recipe holds a unique and cherished place in a chef’s culinary arsenal.
The art of recipe organization for these culinary maestros is not merely a task but a reflection of their profound understanding of food and their mastery of culinary techniques. It is a system that empowers them to transform their culinary knowledge into delectable creations ensuring that the perfect recipe is always within reach ready to be brought to life with passion and precision.
The Foundation of Recipe Organization: Understanding the Chef’s Mind
In the realm of culinary artistry chefs are not merely cooks they are orchestrators of flavor custodians of culinary traditions and innovators who push the boundaries of gastronomy. Their minds are intricate tapestries woven with a deep understanding of food a mastery of culinary techniques and an unwavering passion for creating delectable experiences.
For them recipe organization is not just a mundane task of filing away information it is an art an expression of their culinary philosophy and a testament to their dedication to consistently delivering exceptional dishes.
Chefs approach recipe organization with a profound understanding of the intricacies of food and the nuances of culinary techniques. They recognize that each recipe is a unique narrative a story waiting to be told through the interplay of ingredients, flavors and textures. Their methods of organization are deeply personal reflecting their individual culinary philosophies the demands of their professional kitchens and the unique rhythm of their creative process.
Traditional Methods: Recipe Binders and Cards
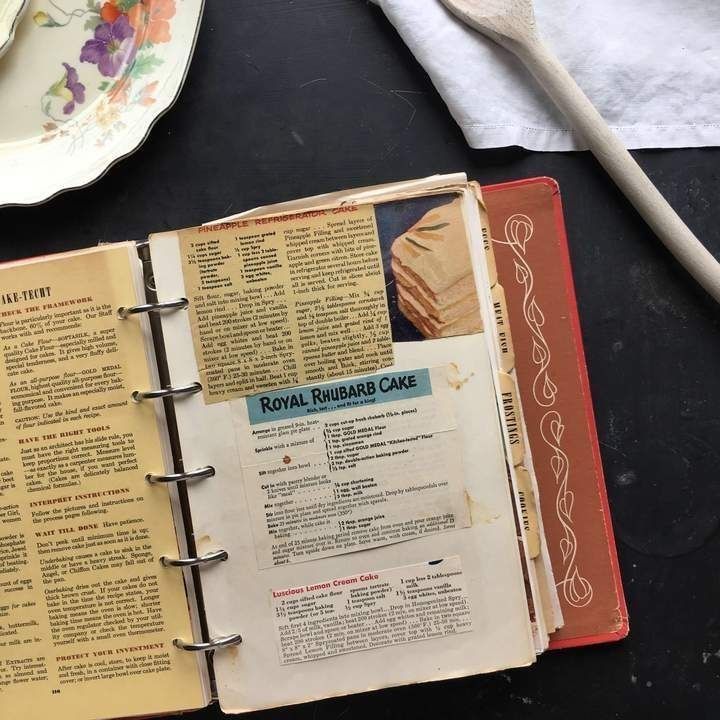
For many chefs recipe binders and index cards remain the cornerstone of their organizational systems serving as tangible testaments to their culinary heritage and expertise. These physical repositories provide a sense of permanence allowing chefs to amass and preserve their vast collections of recipes over time.
Recipe binders often lined with protective plastic sleeves offer a structured approach to categorization enabling chefs to organize their culinary creations by cuisine, course or even specific ingredients. Each binder becomes a culinary archive a physical manifestation of the chef’s culinary journey filled with recipes passed down through generations personal adaptations and innovative creations.
Index cards on the other hand provide a more flexible and adaptable approach to recipe organization. These versatile tools allow chefs to capture fleeting ideas, experiment with new techniques and jot down personal notes and modifications. They become a chef’s culinary sketchbook a place to record culinary inspirations, document trial and error experiments and personalize recipes with their unique touch.
Index cards with their handwritten notes, sketches and spattered ingredients offer a glimpse into the chefs creative process, revealing the passion, innovation and personal touches that make their culinary creations distinct.
Digital Solutions: Embracing Technology in the Kitchen
In the ever evolving culinary landscape chefs are not only masters of flavors and techniques but also savvy navigators of the digital world. They have embraced technology with open arms recognizing its potential to streamline recipe management, enhance accessibility and foster collaboration. Recipe management software, cloud based platforms and mobile apps have become indispensable tools for organizing, accessing and sharing their vast culinary repertoires.
These digital solutions offer a plethora of benefits that cater to the dynamic needs of professional chefs. Keyword search functionalities enable chefs to quickly locate specific recipes amidst their voluminous collections, saving precious time in the fast paced environment of a professional kitchen. Dietary restriction filters allow chefs to effortlessly tailor their menus to accommodate various dietary needs and preferences, ensuring that every diner can enjoy a delectable and inclusive culinary experience.
Cloud based platforms provide chefs with the convenience of accessing their recipes from anywhere, anytime. Whether they’re in the kitchen, at home, or on the go, chefs can seamlessly consult their recipe collections, making last minute adjustments or gathering inspiration for new creations. Moreover, these platforms facilitate collaboration among chefs, enabling them to share recipes, exchange ideas and collectively expand their culinary horizons.
The integration of technology into recipe management has not only enhanced efficiency but also opened up new avenues for culinary innovation. Chefs can now easily experiment with new techniques, incorporate global flavors and adapt recipes to suit local tastes. Digital tools have become catalysts for culinary exploration, empowering chefs to push the boundaries of gastronomy and create truly unforgettable dining experiences.
The Art of Categorization: Finding Order in the Culinary Chaos
To navigate through their vast culinary repertoires chefs employ various categorization techniques transforming their recipe collections into organized and easily accessible archives. These methods often developed through years of experience and personal preferences reflect the chefs’ deep understanding of food and their desire to ensure the consistent delivery of exceptional dishes.
Cuisine based categorization provides a logical framework for organizing recipes by their geographical origins. Chefs can group recipes by French, Italian, Asian or any other cuisine allowing them to quickly locate dishes that align with specific cultural flavors and culinary traditions. This approach is particularly useful for chefs who specialize in a particular cuisine or who frequently create menus that showcase diverse culinary influences.
Course based categorization focuses on the order in which dishes are typically served within a meal. Recipes can be grouped into appetizers, main courses, side dishes, desserts and beverages. This method is particularly useful in professional kitchens where chefs need to efficiently prepare and sequence dishes to deliver a seamless dining experience.
Ingredient based categorization prioritizes the primary ingredients used in recipes. Recipes can be sorted by chicken, seafood, vegetables, grains, legumes or any other ingredient that serves as the foundation of the dish. This approach is particularly useful for chefs who need to quickly find recipes that fit within specific dietary restrictions or that utilize seasonal ingredients.
Occasion based categorization groups recipes by the events or celebrations for which they are typically prepared. Recipes can be categorized by holidays, seasonal celebrations, family gatherings or even everyday meals. This method is particularly useful for chefs who need to plan menus for special occasions or who want to ensure that they have a repertoire of dishes suitable for various gatherings.
By employing a combination of these categorization techniques chefs transform their recipe collections into well organized and easily searchable repositories of culinary knowledge. These methods not only enhance efficiency in the kitchen but also foster culinary creativity allowing chefs to draw inspiration from diverse cuisines, courses, ingredients and occasions to create truly remarkable dining experiences.
Personalizing the Recipe Collection: Adding a Chef’s Touch
Chefs are not merely cooks they are culinary artists, storytellers and innovators. Their recipe collections are not just collections of instructions they are living testaments to their culinary journeys, filled with personal notes, modifications and creative adaptations that reflect their unique culinary perspectives. These personal touches transform recipes from mere blueprints into dynamic expressions of culinary artistry, allowing chefs to showcase their expertise, experiment with new flavors and leave their indelible mark on the culinary landscape.
Chefs often annotate their recipes with personal notes, capturing insights gained from years of experience and experimentation. These handwritten annotations serve as valuable guides, providing tips on ingredient substitutions, cooking techniques and presentation ideas. They become personal culinary diaries offering a glimpse into the chef’s creative process and the lessons learned along the culinary journey.
Modifications are the lifeblood of culinary innovation. Chefs are constantly refining and adapting recipes, drawing inspiration from global cuisines, incorporating seasonal ingredients and tailoring dishes to suit individual preferences. Their recipe collections become dynamic canvases where they experiment with new flavor combinations, explore innovative techniques and create dishes that reflect their evolving culinary sensibilities.
Creative adaptations are the hallmark of a chef’s culinary artistry. By adding their personal touches chefs transform recipes into masterpieces showcasing their unique culinary perspectives and leaving their indelible mark on the world of gastronomy. They may substitute ingredients to accommodate dietary restrictions incorporate unconventional flavor pairings or present dishes in unexpected ways. These creative adaptations become the chef’s signature distinguishing their culinary creations from the ordinary and elevating the dining experience to an art form.
The personalization of recipe collections is not merely an act of organization it is a testament to the chef’s passion for food, their dedication to culinary excellence and their unwavering commitment to creating unforgettable dining experiences. Through their personal touches, chefs infuse their recipes with their unique culinary identities, transforming them into living legacies that inspire culinary enthusiasts and enrich the world of gastronomy.
The Role of Recipe Management in Culinary Success
The last part of How do chefs organize recipes? tells that the effective recipe organization is not just a matter of neatly arranged files and folders it is the foundation upon which a chef’s culinary success is built. A well organized recipe collection empowers chefs to navigate the fast paced demanding environment of a professional kitchen with precision and efficiency ensuring that each dish they create is a symphony of flavors and textures.
Swift Recipe Access: In the heat of the kitchen where every second counts the ability to locate the right recipe at a glance is paramount. An organized system ensures that chefs can seamlessly access the recipes they need without wasting precious time flipping through pages or searching through cluttered folders.
Consistent Quality and Consistency: Culinary excellence hinges on consistency the ability to replicate a dish’s flavors, textures and presentation time after time. A well organized recipe collection provides chefs with the clear instructions and precise measurements they need to deliver consistently exceptional dishes delighting their patrons with every bite.
Knowledge Sharing and Culinary Legacy: A chef’s culinary knowledge is a precious treasure passed down through generations and enriched by personal experiences. Effective recipe organization facilitates the sharing of this culinary heritage, enabling chefs to pass on their recipes, techniques and insights to colleagues and aspiring chefs ensuring the preservation of culinary traditions and the perpetuation of culinary excellence.
Culinary Innovation and Adaptation: A chef’s journey is one of continuous exploration and innovation an organized recipe collection serves as a springboard for creativity allowing chefs to easily revisit and adapt their recipes, incorporating new ingredients, techniques and flavor combinations to push the boundaries of culinary artistry.
Summary of How do chefs organize recipes?
In the realm of culinary artistry where passion meets precision recipe organization stands as a cornerstone of a chef’s mastery. It is not merely a mundane task of filing away information it is an art that reflects a chef’s profound understanding of food their unwavering dedication to excellence and their unwavering commitment to creating unforgettable dining experiences.
Whether meticulously curating recipe binders and index cards or skillfully navigating the digital realm of recipe management software chefs transform their culinary knowledge into organized and accessible repositories of culinary wisdom. These collections infused with personal notes, modifications and creative adaptations become testaments to a chef’s culinary journey, preserving their heritage, inspiring innovation and ensuring that their culinary legacy lives on to delight generations of food enthusiasts.
In How do chefs organize recipes? we explore how chefs employ a variety of methods to organize their vast recipe repertoires, from traditional binders and index cards to digital solutions. This effective recipe organization plays a crucial role in their culinary success, enabling them to access recipes quickly, maintain consistent quality, share knowledge and preserve their culinary heritage.
YOU MAY ALSO LIKE THESE – THESE TOPICS ARE RELATED TO THE CURRENT TOPIC WHICH IS “HOW DO CHEFS ORGANIZE RECIPES?“
If you still have any questions, feel free to mention us in the comments section or explore the FAQs section.
OR
You can also contact us on our Facebook Page
FAQ
Why is recipe organization important for chefs?
In this article How do chefs organize recipes? we discussed how chefs must organize their recipes for several reasons:
Efficiency: A well organized system allows chefs to quickly access the recipes they require, saving time and ensuring smooth kitchen operations.
Accuracy: Proper organization helps to prevent errors and misinterpretations ensuring that dishes are consistently prepared to the chef’s specifications.
Creativity: An organized recipe collection can inspire new culinary ideas and spark creativity.
Knowledge Sharing: Organized recipes encourage chefs to share their knowledge and learn from one another’s expertise.
Scaling and Adaptation: Organized recipes make it easier to scale recipes for various serving sizes and adapt them to meet specific dietary needs or preferences.
What are some of the most common ways chefs organize their recipes?
How do chefs organize recipes? shared that there are variety of methods to organize their recipes, each with its own set of benefits:
Recipe Binders: Physical binders with dividers and tabs make it easy to categorize and retrieve recipes.
Digital Recipe Management Tools: Software and online platforms allow you to store, search, and modify recipes in one place.
Handwritten Notes and Cards: Some chefs prefer handwritten notes or recipe cards for their personal touch and flexibility.
Color Coding System: Assigning different colors to different categories or cuisines can help with visual organization.
Cross Reference: Making links between recipes and related ingredients, techniques or occasions makes navigation easier.
What are some pointers for keeping recipes organized at home?
How do chefs organize recipes? shared effective recipe organization and home cooks which can use techniques similar to chefs:
Course: Arrange recipes according to meal type, such as breakfast, lunch, dinner, snacks, and desserts.
Cuisine: Separate recipes based on culinary traditions or regions.
Use Keyword Tags: Add relevant tags to recipes to facilitate keyword searches.
Rate and Review Recipes: Keep track of personal experiences with recipes, which can help you make more informed decisions when choosing dishes.
Consider Storage Options: Select storage methods based on your preferences and space constraints.
How can chefs improve recipe organization by utilizing technology?
How do chefs organize recipes? tells that the technology provides a variety of tools to help with recipe organization:
Recipe Management Apps: These apps offer a user-friendly interface for storing, searching, and categorizing recipes.
Cloud Storage Services: Recipes can be accessed from any device thanks to cloud-based storage.
OCR Technology: Tools for optical character recognition (OCR) can convert handwritten recipes into digital text, making organization easier.
Platforms for Recipe Sharing: Online platforms enable chefs to share and collaborate on recipes with colleagues and enthusiasts.
Voice Assistants: Voice assistants can help with hands free recipe searches in the kitchen.
How can chefs keep their recipe organization going over time?
In How do chefs organize recipes? we discussed that the regular maintenance is required to keep an organized recipe collection:
Periodic Reviews: Reevaluate the organization system on a regular basis to ensure its effectiveness.
Update Recipes: Keep recipes up to date with recent changes or improvements.
Archive Old Recipes: To save space and maintain clarity, consider archiving infrequently used recipes.
Share and Collaborate: Connect with other chefs to share organizational best practices and tips.
Adapt to Changing Needs: As culinary interests and cooking styles change, so should the organization system.
How do chefs organize recipes?
In How do chefs organize recipes? we explore how chefs employ a variety of methods to organize their vast recipe repertoires, from traditional binders and index cards to digital solutions. The core purpose of How do chefs organize recipes? helps you understand organizational techniques which often deeply personal and tailored to individual culinary philosophies, encompass both traditional and digital approaches.
Unveiling the Culinary Narratives: Why Recipes Are More Than Just Ingredients and Instructions
Overview of Why do people write so much for a recipe?
In Why do people write so much for a recipe we will discuss how online recipes frequently come with long introductions and tales that many find themselves quickly passing over in the busy world of the internet where time is a valuable resource. Their eyes search excitedly for the classic ingredient list and the detailed instructions longing to turn words into culinary marvels. However there’s a rich tapestry of reasons why recipe authors decide to include stories in their cooking masterpieces even in between these ostensibly superfluous prologues.
1. SEO or search engine optimization – Attracting the Digital Foodies
Search engine optimization or SEO is a critical component in the competitive online content industry since it makes sure that those looking for recipes can find them. Websites are ranked by search engines like Google using algorithms that take into account a number of variables including the volume and caliber of information. Rich text recipes that are longer typically rank higher and attract the attention of potential viewers.
One crucial reason lies in the realm of search engine optimization (SEO). In Why do people write so much for a recipe? we aren’t going to learn about SEO but highlighting the core reasons of this article is the only goal of this article.
However, in the competitive online content industry SEO ensures that those seeking culinary inspiration can readily find the recipes they crave. Search engines like Google employ algorithms that consider various factors including the volume and quality of information to rank websites. Rich text recipes often with lengthier introductions tend to rank higher attracting the attention of potential viewers. This increased visibility allows recipe authors to share their culinary expertise with a wider audience fostering a vibrant community of food enthusiasts.
Moreover, these introductions often provide valuable insights into the historical context, cultural significance and personal memories associated with the dish. This contextual information can enhance the culinary experience by deepening our understanding of the dish’s origins, traditions and the passion behind its creation. By appreciating the stories woven into recipes we can approach cooking with a newfound appreciation allowing us to create dishes that are not only flavorful but also imbued with cultural richness and personal resonance.
Therefore while the lengthy introductions may seem like mere distractions in the fast paced digital world they serve a significant purpose. They not only enhance the discoverability of recipes but also enrich our culinary journey enabling us to appreciate the dish’s deeper meaning and create meals infused with cultural significance and personal expression.
2. Establishing Trust: The Culinary Credential
Giving away recipes is a sign of culinary kindness and demonstrates one’s skill and love for the culinary arts. Recipe writers engage with their readers by carefully incorporating personal tales and observations which positions them as reliable providers of culinary expertise. This trusting relationship is crucial for boosting readers confidence and motivating them to start their culinary journeys.
The inclusion of personal stories within recipes goes beyond mere entertainment it imbues dishes with a deeper significance transforming them from mere meals into expressions of cultural heritage and personal narratives. By sharing their culinary experiences, recipe writers invite their readers into their kitchens, offering a glimpse into their culinary traditions, family recipes and the emotions that inspire their creations.
This intimate exchange of culinary insights fosters a sense of community among food enthusiasts creating a shared space where individuals from diverse backgrounds can connect through their appreciation for the art of cooking. Recipe writers serve as guides and mentors, encouraging readers to explore new cuisines, experiment with unfamiliar flavors and embrace the joy of creating culinary masterpieces in their own kitchens.
3. Offering Inspiration and Context
Recipes are stories waiting to be told, tales of cultural customs, culinary heritage and cherished memories. They are much more than just a list of ingredients and directions. Recipe writers give their recipes depth and richness by adding backstory and context turning them from simple instructions into engrossing stories.
Recipe writers become storytellers weaving their personal anecdotes and insights into the fabric of their recipes inviting us into their culinary journeys. They guide us through the process of creating dishes that not only satisfy our palates but also connect us to the rich tapestry of culinary traditions and the heartwarming stories that breathe life into them.
As we immerse ourselves in these culinary narratives we gain a deeper appreciation for the art of cooking recognizing it not just as a means of sustenance but also as a form of storytelling a way to connect with our heritage, share our passions and create lasting memories through the power of food.
4. Taking Various Learning Styles Into Consideration
Just as palates vary in their preferences so do learning styles when it comes to culinary instruction. While some individuals thrive on visual cues and concise explanations others prefer the reassurance of detailed instructions and comprehensive background information. To cater to this diversity of learning preferences recipe writers can adopt a multifaceted approach providing a range of content formats that enhance the accessibility of their recipes.
For those who gravitate towards visual learning incorporating high quality images and videos can prove invaluable. Step by step visuals can effectively illustrate complex techniques while captivating food photography can inspire and entice making the recipe more engaging. Additionally, providing clear and concise written instructions alongside the visuals ensures that no detail is overlooked catering to those who prefer a more structured approach to learning.
For those who seek a deeper understanding of the culinary process offering detailed explanations and historical context can enrich the learning experience. Delving into the origins of the dish the cultural significance of specific ingredients and the scientific principles behind cooking techniques can provide a broader perspective transforming the recipe from a mere set of instructions into an educational journey.
By embracing a variety of content formats recipe writers can effectively cater to a wider audience ensuring that their culinary expertise is accessible to individuals with diverse learning styles. This inclusive approach not only enhances the overall user experience but also promotes a deeper appreciation for the art of cooking and the cultural traditions that underpin it.
5. Improving the Experience for Users
Recipes transcend the confines of our kitchens inviting us on a culinary journey through diverse cultures and traditions. Lengthier recipe introductions can set the stage by providing historical context insights into culinary techniques and a glimpse into the rich tapestry of cultural influences that shaped the dish. This contextual information transforms cooking from a mere task into an immersive experience, making it more enjoyable, engaging and meaningful.
By delving into the origins of the dish the symbolism behind certain ingredients and the cultural significance of cooking methods recipe writers enrich our understanding of the culinary landscape. They weave stories that transport us to far flung corners of the world introducing us to the culinary heritage and traditions that have been passed down through generations.
These culinary narratives become a bridge between cultures fostering a sense of appreciation for the diversity of culinary practices and the shared human experience of food. They remind us that cooking is not just about satisfying our hunger, its about connecting with our heritage, sharing our passions and creating memories that linger long after the last bite.
As we immerse ourselves in these culinary tales, we gain a deeper appreciation for the art of cooking, recognizing it as a form of storytelling, a way to connect with our past, celebrate our cultural diversity and create lasting memories through the power of food.
6. Taking Care of the Skimmers – Respecting Time and Convenience
In today’s fast paced world time is a precious commodity and not everyone has the luxury of leisurely reading through lengthy recipe introductions. Recognizing this many recipe authors have adopted a more user friendly approach by incorporating “Jump to Recipe” buttons and highlighting key passages with bold or italicized text. This thoughtful strategy preserves the richness of the recipe’s narrative while ensuring that time constrained individuals can quickly access the essential information.
By catering to the diverse needs of their audience recipe writers demonstrate their understanding that cooking should be an enjoyable and accessible experience not a daunting task. The inclusion of these user centric features not only enhances the overall user experience but also promotes a more inclusive approach to culinary exploration.
Moreover this user friendly design encourages individuals to delve into the recipe’s story at their own pace allowing them to appreciate the cultural context and personal anecdotes that enrich the recipe’s meaning. By striking a balance between providing informative content and respecting the reader’s time constraints recipe writers can foster a deeper appreciation for the art of cooking and the cultural traditions that underpin it.
7. The Value of Equilibrium – Informing without Overwhelming
Crafting a great recipe requires striking a delicate balance between providing helpful details and maintaining simplicity. While lengthy introductions can be engaging and informative its crucial not to lose sight of the primary goal, delivering clear and concise instructions that guide readers towards creating a delicious dish.
Recipe writers should strive to find the sweet spot between informative storytelling and practical guidance. While sharing personal anecdotes and historical context can enhance the culinary experience its essential to avoid overwhelming readers with excessive details. The key lies in curating the information to provide a rich and meaningful context without sacrificing the clarity of the instructions.
Ultimately the goal is to empower readers to confidently navigate the culinary process transforming them from passive observers to active participants in the art of cooking. By striking this balance recipe writers can not only share their culinary expertise but also inspire a passion for cooking in others.
Summary of Why do people write so much for a recipe?
Why do people write so much for a recipe? highlight that the craft of recipe writing which combines culinary knowledge with narrative beauty is a monument to the timeless power of storytelling. Authors who incorporate stories into their recipes not only give helpful directions but also take readers on a journey of personal growth, culinary inspiration and cultural exploration. These stories turn recipes into permanent legacies that are passed down through the years encouraging a common admiration for culinary art.
The article “Why do people write so much for a recipe?” delves into the intricate world of recipe writing exploring the reasons why recipe authors go beyond mere ingredient lists and instructions to weave captivating narratives into their culinary creations. It highlights the multifaceted role of recipes not just as guides for preparing dishes but also as repositories of cultural heritage, personal anecdotes and culinary inspiration. The article emphasizes the importance of striking a balance between providing essential information and respecting the reader’s time ensuring that recipe introductions enhance the culinary experience without overwhelming the audience.
YOU MAY ALSO LIKE THESE – THESE TOPICS ARE RELATED TO THE CURRENT TOPIC WHICH IS “WHY DO PEOPLE WRITE SO MUCH FOR A RECIPE?”
If you still have any questions, feel free to mention us in the comments section or explore the FAQs section.
OR
You can also contact us on our Facebook Page
FAQs
Why do people write so much for a recipe?
In this article Why do people write so much for a recipe? we discussed that there are several reasons why recipe writers include lengthy introductions and anecdotes in their online recipes. These include:
1. SEO (Search Engine Optimization): Lengthier recipes with rich text tend to rank higher in search engine results making them more visible to potential viewers.
2. Building Trust and Credibility: Sharing personal anecdotes and insights can help recipe writers establish themselves as trusted sources of culinary knowledge and build rapport with their readers.
3. Providing Context and Inspiration: Recipes can be more than just a list of ingredients and instructions. They can also provide historical context, cultural significance and personal memories associated with the dish.
4. Catering to Different Learning Styles: Some people prefer to read detailed instructions and background information, while others prefer to follow along with visual cues. By providing a variety of content formats, recipe writers can cater to different learning styles.
5. Enhancing the User Experience: Lengthy recipe introductions can set the mood, provide historical context and offer insights into the culinary techniques involved making the cooking process more enjoyable and engaging.
How do recipe writers balance providing enough information with respecting the reader’s time?
The purpose of this article Why do people write so much for a recipe? is to differentiate the pov of another side of recipe writers, writing successful recipe is to strike a balance between providing enough information and respecting the reader’s time is the essential goal for any recipe writer. Recipe writers can achieve this balance by:
1. Using clear and concise language: Avoid using overly technical jargon or unnecessary details. 2. Breaking down instructions into manageable steps: Divide complex recipes into smaller, more manageable steps to make them easier to follow. 3. Providing visual aids: Include images or videos to illustrate key steps or techniques. 4. Offering a jump to recipe button: Allow time pressed individuals to quickly access the essential information without sacrificing the richness of the recipe’s narrative.
Which type of learning styles covered in this article Why do people write so much for a recipe?
In Why do people write so much for a recipe? illustrates recipe writers that they can cater to different learning styles by:
1. Providing detailed instructions for those who prefer a more structured approach: Include step by step directions with clear explanations and measurements. 2. Using visual cues for those who prefer visual aids: Include images or videos to illustrate key steps or techniques. 3. Offering alternative explanations for complex techniques: Provide different ways of explaining complex techniques to cater to different learning styles.
How do recipe writers address the needs of skimmers who just want to get to the ingredients and instructions quickly?
As previously mentioned in Why do people write so much for a recipe? that the Recipe writers can address the needs of skimmers by:
1. Providing a jump-to-recipe button: Allow time pressed individuals to quickly access the essential information. 2. Highlighting key sections in bold or italics: Make it easy for skimmers to find the most important information. 3. Using clear and concise language: Avoid using overly technical jargon or unnecessary details. 4. Breaking down instructions into manageable steps: Divide complex recipes into smaller more manageable steps to make them easier to follow.
How do recipe writers maintain a balance between providing helpful details and not overwhelming the reader with too much information?
In Why do people write so much for a recipe? we discussed how recipe writers can maintain a balance between providing helpful details and not overwhelming the reader with too much information by:
1. Being selective about the information they include: Focus on providing the most essential information and avoid unnecessary details. 2. Using clear and concise language: Avoid using overly technical jargon or overly complex sentence structures. 3. Organizing information logically: Present information in a structured way that makes it easy for the reader to follow. 4. Using visual aids: Include images or videos to illustrate key steps or techniques.
How has the evolution of recipe writing impacted the culinary landscape?
The evolution of recipe writing has significantly impacted the culinary landscape. The purpose of Why do people write so much for a recipe? is to highlight the evolution from handwritten notes to online platforms the way recipes are shared has transformed making culinary knowledge more accessible and fostering a more connected culinary community. As technology advances recipe writing will continue to play a crucial role in shaping the future of food.
Culinary Origins: Revealing the Mysterious Background of the Founder Recipe
Overview of Who made the first recipe:
In Who made the first recipe we will discuss the topic of who invented the original recipe is still a mystery in the field of culinary history one that has long captivated foodies and academics alike. The exact beginnings of recorded recipes are still a mystery but there are important hints to this intriguing culinary enigma to be found in the development of culinary techniques and the preservation of antiquated culinary customs.
Examining the Past in Culinary Arts: Dissecting Early Culinary Documents
Akkadian treasure, Old Babylonian era. Unearthed clay tablet, ca. 1800 B.C., possibly Larsa, Iraq.
The first known written recipes were discovered on cuneiform tablets in Mesopotamia the region between the Tigris and Euphrates rivers and date to around 1730 BCE. Written in the Semitic language of Akkadian which was used in ancient Mesopotamia these ancient recipes offer comprehensive directions for making a wide range of foods, such as breads, stews and even beer.
These ancient Mesopotamian tablets provide a fascinating window into the culinary customs of a prehistoric society demonstrating their understanding of materials, methods of preparation and the significance of food as a means of subsistence, cultural expression and social interaction.
Cooking Customs Throughout History: An Anthology of Recipes
Make bread fit for a pharaoh and a sweet treat out of tiger nuts.
Although the earliest known written recipes are from Mesopotamia other ancient civilizations also had distinctive culinary traditions and preserved their recipes. Hieroglyphics from Egypt show scenes of food preparation, preservation and consumption. Greek and Roman cookbooks provide information about the varied Mediterranean cuisine.
These old recipes which have been preserved on parchment, papyrus scrolls and clay tablets offer important insights into the development of culinary skills the utilization of a variety of materials and the symbolic role that food has had in various civilizations.
Preserving Recipes and Culinary Practices: The Role of Women in Culinary Traditions
Women have always been essential in maintaining and passing on culinary customs which are frequently handed down through the generations within families and communities. Known by many as “culinary keepers” these women preserved the expertise of cooking methods, ingredient selection and preparation. The various culinary traditions that we enjoy today have been greatly influenced by their contributions to culinary heritage.
These women who frequently worked in homes and kitchens were the guardians of culinary expertise preserving culinary traditions by handing down techniques and recipes from one generation to the next. They were the pioneers of the food industry blending new tastes, testing out ingredients and customizing recipes to fit the needs and resources of their particular locale.
Their contributions to culinary heritage are often overlooked yet their legacy lives on in the rich tapestry of flavors and techniques that we enjoy today.
The Rise of Modern Recipes: Standardization and Dissemination
The printing press was invented in the 15th century and its widespread publication and standardization of recipes led to a radical shift in the dissemination of culinary knowledge.
The public’s access to culinary knowledge was increased and a deeper comprehension of the culinary arts was fostered by these printed recipes which were regularly developed and updated by seasoned chefs.
The standardization of recipes allowed for the exchange of flavors and techniques among many geographical and cultural contexts which notably contributed in the growth of modern cuisine.
Further progress in the culinary arts was made possible by the establishment of culinary schools and the professionalization of cooking.
The Never Ending Search for Culinary Origins
The search for the exact beginnings of the first recipe is still ongoing despite the abundance of culinary history and the preservation of old recipes. Culinary historians, linguists and archaeologists are constantly finding fresh pieces of evidence that help them piece together the complex web of culinary customs and practices that spans civilizations.
Each new piece of information uncovered whether it is a tablet unearthed or a hieroglyph translated advances our understanding of the roots of our gastronomic world.
In conclusion of Who made the first recipe
The conclusion of Who made the first recipe is the evolution of recipes from prehistoric cuneiform tablets to contemporary cookbooks exemplifies the enduring interplay between language, culture and food. Every recipe whether ancient or modern bears witness to the resourcefulness, inventiveness and cultural heritage of individuals who have passed down their culinary wisdom through the ages.
These recipes both old and new offer us a rich history of flavors, methods and cultural insights as we continue to explore the culinary world. They also serve as a constant reminder of the eternal ambition to create and relish culinary delights, as well as the fundamental connection between food and our shared humanity.
We take a trip down memory lane with this gastronomic voyage charting the development of flavors, methods and customs that have molded the modern culinary scene. We discover the tales concealed inside recipes which span from ancient Mesopotamia to contemporary kitchens. Each tale is a monument to the inventiveness and cultural legacy of individuals who have passed down their culinary expertise across the decades.
In Who made the first recipe we learn that the origins of the first recipe remains an ongoing journey yet the enduring legacy of culinary traditions lives on in the recipes we cherish today. From ancient cuneiform tablets to contemporary cookbooks, these recipes serve as a testament to the ingenuity, creativity and cultural heritage of those who have passed down their culinary wisdom across generations. They offer us a rich tapestry of flavors, techniques and cultural insights reminding us of the profound connection between food, our shared humanity and the eternal ambition to create and savor culinary delights.
YOU MAY ALSO LIKE THESE – THESE TOPICS ARE RELATED TO THE CURRENT TOPIC ABOUT “WHO MADE THE FIRST RECIPE?”
If you still have any questions, feel free to mention us in the comments section or explore the FAQs section.
OR
You can also contact us on our Facebook Page
FAQs
Who made the first recipe?
The exact identity of the person who made the first recipe remains unknown. However the earliest known written recipes date back to around 1730 BC and were found on cuneiform tablets in Mesopotamia the region between the Tigris and Euphrates rivers.
What were the earliest known recipes like?
The earliest known recipes were written in Akkadian a Semitic language used in ancient Mesopotamia. They provided comprehensive instructions for making a variety of foods such as breads, stews and even beer. These recipes offer valuable insights into the culinary customs and practices of prehistoric societies.
What role did women play in preserving and transmitting culinary traditions?
In Who made the first recipe we discussed how women have always played a crucial role in maintaining and passing down culinary customs through the generations within families and communities. They were often referred to as “culinary keepers” and preserved the expertise of cooking methods, ingredient selection and preparation. Their contributions have significantly influenced the various culinary traditions we enjoy today.
How did the invention of the printing press impact the dissemination of culinary knowledge?
The invention of the printing press in the 15th century revolutionized the sharing of culinary knowledge. Printed recipes became widely available allowing more people to access and learn about different cuisines and cooking techniques. This contributed to the standardization of recipes and the exchange of flavors and techniques across various geographical and cultural contexts fostering the growth of modern cuisine.
What is the significance of preserving culinary traditions?
Preserving culinary traditions is essential for safeguarding our cultural heritage and ensuring the continued transmission of culinary knowledge and skills across generations. Recipes serve as a tangible link to the past providing insights into the resourcefulness, inventiveness and cultural legacy of individuals who have passed down their culinary expertise.
What can we learn from studying ancient recipes?
Studying ancient recipes can provide us with valuable insights into the evolution of culinary techniques, the utilization of different ingredients and the cultural significance of food. It allows us to appreciate the rich tapestry of flavors and methods that have shaped the culinary world across civilizations.
What is the future of culinary history research?
The search for the exact origins of the first recipe is an ongoing endeavor and culinary historians, linguists and archaeologists are constantly uncovering new pieces of evidence that help piece together the complex web of culinary customs and practices throughout history. As research continues we can expect to gain a deeper understanding of the roots of our gastronomic world.
What is the importance of sharing and passing down recipes within families and communities?
Sharing and passing down recipes within families and communities holds significant cultural and personal value. It allows for the preservation of culinary traditions the transmission of culinary knowledge from one generation to the next and the fostering of a sense of connection and shared identity. Recipes often carry emotional significance evoking memories of family gatherings, holidays and cherished moments. Sharing these recipes not only preserves the flavors and techniques of the past but also strengthens bonds and creates lasting connections within families and communities.
Interpreting the Culinary Lexicon: An exploration of the evolution of “Receipts” in traditional recipes
Overview of Why are old recipes called receipts?
Lets dig deep in Why are old recipes called receipts?. The phrases “recipe” and “receipt” are now frequently used interchangeably in the culinary arts to refer to a set of directions for making a dish. But exploring the linguistic background of these terms tells a fascinating story of how cuisine has changed over time and how language usage has changed too.
Comparable Etymologies: A linguistic journey
We can trace the etymological roots of the words “recipe” and “receipt” back to the Latin verb “recipere” which means “to receive” or “to take.” This same root suggests that both phrases have the same fundamental function which is to give directions for making or getting something.
“Receipts” as Historical Models for Culinary Practice: A Look Back
The word “recipe” was not as widespread when culinary habits were first recorded. This may be observed in many medieval cookbooks and kitchen journals, where “recipes” refer to precise instructions for preparing delectable meals, crafting household goods and formulating medicinal remedies.
Often written in a more literary style these early “receipts” included personal touches and anecdotal descriptions in addition to exact measurements and techniques, they preserved the rich tapestry of culinary traditions and acted as invaluable archives of culinary knowledge that had been passed down over the years.
The Growing “Recipe” Movement and the Changing Culinary Scene
The favored term for cooking instructions has been “recipe” which has increasingly replaced “receipt” in culinary discourse. This change in use followed the development of cooking methods which saw a rise in complexity and refinement in food as well as a focus on exact measures and methods.
An increasingly regimented and prescriptive approach to recipe writing resulted from the establishment of standardized culinary techniques and the growing influence of professional chefs. “Recipes” evolved into more structured documents with detailed ingredient lists, easy to follow directions and accurate measurements in order to serve a larger audience and promote the sharing of culinary expertise.
Language Related Factors Fueling the Transition: A Conjectural Examination
The term “recipe” became more popular than “receipt” in culinary contexts for a variety of reasons. Its possible that people thought of “recipe” as a more exact and sophisticated phrase that fit the ever intricate culinary techniques. The fact that it is linked to conventional cooking techniques and professional chefs may have increased its perceived legitimacy and authority.
Furthermore, the growing standardization of culinary techniques might have contributed to the inclination toward a more standardized term such as “recipe”. A common vocabulary was required as culinary expertise spread and became more accessible to guarantee uniformity and clarity among various culinary traditions and geographical areas.
“Receipt” Surviving in Health Environments: A Legacy Maintained
The word “receipt” was still used in medical situations even though it eventually lost popularity in culinary circles. Prescriptions, pharmaceutical formulations and treatment administration instructions all continued to be referred to by this title. The fact that this term is still being used shows how “receipt” has always been associated with the exact instructions needed for medical procedures and treatments.
Within the medical domain, the term “receipt” retained its meaning of exactitude and precision, underscoring the significance of closely adhering to guidelines to ensure the secure and efficient dispensing of medications and therapies.
Spoken Language Variations: An Intriguing Example of Reverse Evolution
In an odd linguistic turn of events the word “recipe” briefly reappeared in 18th century culinary circles. This comeback might have resulted from a desire to maintain the historical context of recipes as well as a rebirth of interest in conventional cooking techniques.
“Receipts” was the chosen name for cooking instructions in many historical cookbooks and culinary manuscripts that culinary historians and aficionados came across in their quest to revive and document traditional culinary traditions. The phrase may have briefly returned as a result of this exposure, indicating a deliberate attempt to maintain the language legacy of culinary customs.
“Receipt” of Today: A Gastronomic Curiosity or a Relic of the Past?
“Receipt” is a term that is mostly found in antique cookbooks and very seldom used in culinary situations today. It does however remind us of the intriguing history of language and the development of culinary language.
The term “Receipt” has been gradually losing use in culinary discourse which is indicative of how food and culture are evolving. The necessity for a more formal exact term like “recipe” developed as culinary processes got more regulated and defined and as cuisine changed.
Final Thoughts of this article Why are old recipes called receipts?: A Gastronomic Linguistic Adventure
A fascinating picture of linguistic history and the dynamic nature of culinary terminology is painted by the similar etymologies of “recipe” and “receipt” their divergent paths in culinary usage and the brief resurrection of “recipe” in the 18th century.
These phrases serve as poignant reminders of the rich history and continuing legacy of culinary traditions as we continue to study the culinary arts, they draw attention to the fluid character of language and its complex connection to the constantly changing food landscape.
“Receipt” to “recipe” is a path that reflects the development of culinary arts from the unstructured and anecdotal narratives found in early cookbooks to the organized and exact directions found in contemporary recipes. The standardization of culinary techniques, the rise in influence of professional chefs and the complexity and refinement of cuisine are all reflected in this linguistic transition.
“Receipt” is becoming less and less common in cooking but its still an important artifact of culinary history carrying the language traces of earlier cooking customs. The fact that its still used in medical settings shows how accurate and precise are still valued in both the culinary and medical fields.
This article Why are old recipes called receipts? delves into the fascinating etymologies of “recipe” and “receipt” tracing their shared origins and exploring their divergent paths in culinary usage. It sheds light on the reasons behind the transition from “receipt” to “recipe” in the 18th century and highlights the enduring legacy of “receipt” in medical contexts.
YOU MAY ALSO LIKE THESE – THESE TOPICS ARE RELATED TO THE CURRENT TOPIC ABOUT “WHY ARE OLD RECIPES CALLED RECEIPTS?”
If you still have any questions, feel free to mention us in the comments section or explore the FAQs section.
OR
You can also contact us on our Facebook Page
FAQs
What are some other interesting facts about the history of recipes?
Here are some additional tidbits about the history of recipes:
1. The earliest known cookbook dates back to Ancient Mesopotamia around 1700 BCE. 2. Early cookbooks were often handwritten and passed down through families. 3. The first printed cookbook “De Re Coquinaria” by Apicius was published in the 5th century CE. 4. Cookbooks played a significant role in the dissemination of culinary knowledge throughout history. 5. The rise of mass media such as cookbooks and cooking shows has transformed the way recipes are shared and accessed today.
Why are old recipes called receipts?
The words “recipe” and “receipt” share a common etymology, both tracing back to the Latin word “recipere” meaning “to receive” or “to take.” In the context of early cookbooks, the term “receipt” was used to refer to a set of instructions for preparing a particular dish similar to how we use the word “recipe” today.
When did the word “recipe” become more popular than “receipt” in culinary contexts?
In current article Why are old recipes called receipts? we discuss in depth about the transition from “receipt” to “recipe” in culinary contexts occurred gradually over time with the latter term gaining prominence in the 18th and 19th centuries. This shift can be attributed to several factors including the increasing standardization of culinary techniques, the rise of professional chefs and the growing complexity and refinement of cuisine.
Why is the word “receipt” still used in medical contexts?
The word “receipt” remains in use in medical contexts because it conveys a sense of precision and exactitude. Medical prescriptions, pharmaceutical formulations and treatment administration instructions all require careful attention to detail and the word “receipt” emphasizes the importance of following instructions accurately.
Are there any other interesting linguistic connections between “recipe” and “receipt” which is not cover in Why are old recipes called receipts?
Yes, there are a few additional linguistic connections between the two words. For instance the word “recipe” can also be used to refer to a formula or a set of instructions for accomplishing something other than cooking. Additionally the word “receipt” can be used to refer to a written record of a transaction such as a purchase or a payment.
What does the evolution of these two words tell us about the history of cooking?
The Why are old recipes called receipts? tells us about the changing usage of “recipe” and “receipt” reflects the evolving nature of culinary practices over time. The shift from “receipt” to “recipe” suggests a move towards greater standardization, precision and sophistication in cooking. It also highlights the growing influence of professional chefs and the increasing complexity of cuisine.